Click here for a complete list of All About Symbian's Nokia 5800 XpressMusic tutorials
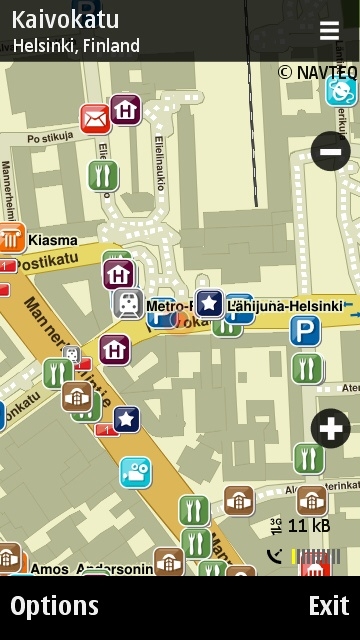
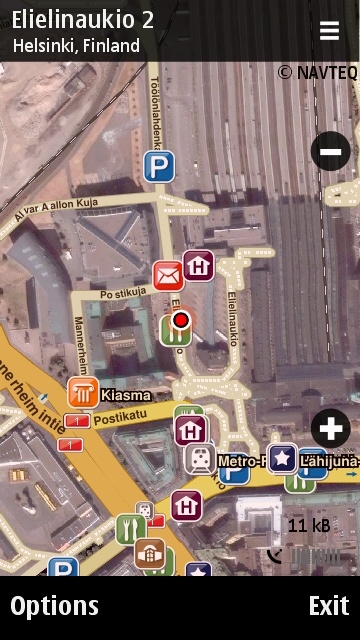
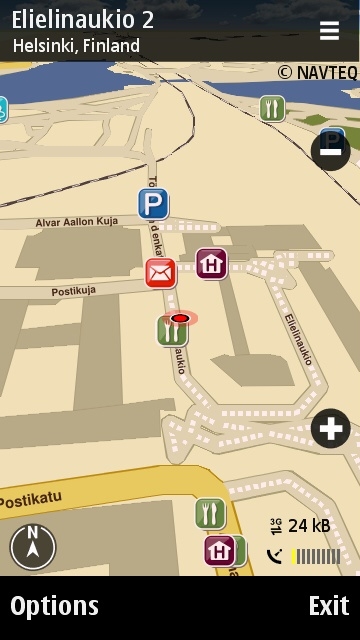
Nokia Maps showing the centre of Helsinki. The map on the left is in 2D mode, the map on the right is in Hybrid mode (which combines 2D maps with satellite and aerial photos), the map on the bottom is in 3D mode. The icons indicate different types of services, and you can choose which service categories are shown on the map.
How to use the GPS satellite navigation and Nokia Maps on the Nokia 5800 XpressMusic
The Nokia 5800 has a built-in GPS satellite navigation receiver, which can tell you where you are anywhere on the planet. The 5800 also has cell-tower-positioning technology, which finds your location using the position of the nearest phone network mast if a satellite signal is unavailable. GPS is more accurate but can take a while (from 10 seconds to a few minutes, depending on how obstructed the sky is) to find your position ('Assisted GPS' is also present, to download the expected GPS satellite positions from the Internet and help speed up your fix.)
The 5800 also has a built-in mapping application called Nokia Maps, which shows you your location on a street map, tells you exactly how to get to another location by driving or walking, and can give details of nearby amenities such as shops, fuel stations, museums, etc. Nokia Maps uses both GPS and cell tower positioning to tell you where you are: the latter gives an instant rough position, while GPS data is used after the phone has locked onto enough satellite signals calculate its position. You'll know the phone is locked onto a satelite as the lock indicator at the bottom of the screen will turn green.
Other phone applications can also use the GPS receiver if required. For example the camera application can optionally "geotag" photos with your current location using the GPS receiver to work out where you are (click here to see our camera tutorial and find out more about geotagging). If you switch to the standby or menu screens while an application is using the GPS receiver, you'll see a little satellite icon in the top right corner of the screen to indicate that GPS is active.
How does the 5800's GPS work?
Like all satellite navigation systems, the 5800 receives signals from many different GPS satellites in the sky, and calculates your position based on those signals, using a combination of triangulation, signal delay calculation and a lot of very heavy maths that you really don't want to know about.
Important Note: Satellite signals cannot penetrate buildings, so GPS satellite signals will be difficult or impossible to receive if you are indoors and away from windows. If you want to speed up the process of GPS showing your location, take the phone outside or place the phone next to a large window with a good view of the sky.
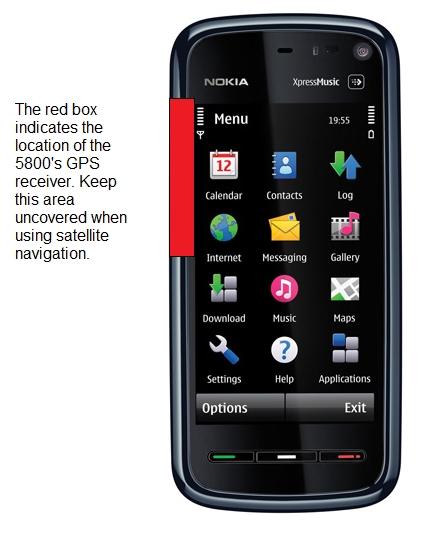
The 5800's GPS aerial is inside the top left side of the phone. If you want to get a good GPS lock make sure this part of the phone is uncovered:
How much does Nokia Maps cost to use?
Nokia Maps is mostly free. You can see your current location, look at all of its worldwide maps and satellite photos, and search all of the locations in its global database at no extra charge. Nokia purchased the mapping company Navteq a few years ago, so it has full access to Navteq's map data.
However, there are two main things which may not be free: the on-phone route-planning feature, and the cost of downloading map data.
The route-planning feature lets your phone calculate a driving or walking route based on road data, shows the complete route on the map, and gives turn-by-turn voice guidance if required (e.g. "Turn left at the next crossing."). You can purchase a route-planning licence within the Nokia Maps application, which can be paid for by a credit card or through your phone bill. This licence is linked to your SIM card, so you can change phones without losing your Nokia Maps subscription. The route-planning feature sometimes comes bundled with a phone at no extra charge, with the licence usually lasting for six months or a year. Ask your phone retailer about this if you're unsure, they should be able to tell you if there's route-planning is included in the phone's price.
If you're going to download map data through the phone network while on your journey, you may have to pay data charges. However, an increasing number of people have a flat rate data plan, in which case downloading the map data will cost nothing. If you're unsure what your data charges are, ask your phone network operator. If your data plan isn't flat rate, ask if they have any flat rate plans available, as they're becoming quite common nowadays.
If you prefer, you can download all of the map data for Nokia Maps at home through your computer, then transfer it to your phone. This has two advantages: people with non-flat data charges will save money, and it allows Nokia Maps to work in areas where there is no phone signal. To do this, you'll need to install an application called Nokia Map Loader on your computer, which is free and can be downloaded from the Nokia Maps download page.
Important Note: If you're using flat-rate internet through your phone network, remember that flat-rate plans usually don't work when you're in a foreign country. If you want to use phone network internet access while on holiday, make sure you know how much it will cost to access data on your phone while abroad. If your phone is unlocked (aka SIM-free or unbranded) you might want to consider buying a local SIM card while abroad, so you can access data at a cheaper rate. Unlocked phones can use any SIM card, so they are very suited to going overseas. (For more info about using the 5800 while overseas, click here to see our special tutorial on the subject.)
Money-Saving Tip: A little-publicised feature of Nokia Maps is that although the on-phone route navigation is a premium service, you can use Nokia Maps on-computer route planning feature for free, and print the route out to refer to it on your journey. This can be done through Nokia's Ovi Maps website. If you have an on-phone route-planning subscription, you can also move these routes onto your phone through a synchronisation service, also through the Ovi Maps site.
How do I use Nokia Maps?
Nokia Maps has lots of features which allow you to do all kinds of stuff with your location. We're going to explain how to use these features one at a time. All these features are free to use, unless the text says otherwise.
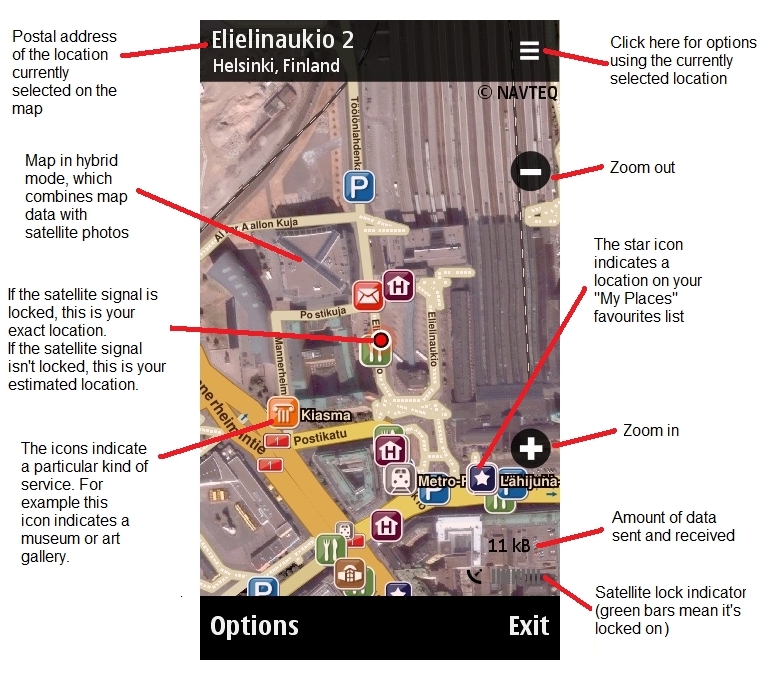
First of all though, here's a visual guide to the main elements of the Nokia Maps screen:
- How to start Nokia Maps
1. From the main standby screen, press the white menu button.
2. Select "Maps".
3. If this is the first time it has been run, you may be asked whether the application can access the internet. If you're using the mobile phone network to access the internet, make sure you know how much it costs (if necessary contact your phone network operator). If you don't want to let Nokia Maps access the internet, you can pre-load your required map data onto your phone from your computer using Nokia Map Loader.
- How to see maps, satellite photos and 3D views
By default Nokia maps shows the 2D map view, but you can also view satellite photos, and a 3D map too. If you're using the phone network to download data, note that the satellite photo and hybrid modes download a lot more data than the plain maps.
To see the other views in Nokia Maps, select "Options" and then whatever view you want to use.
You can zoom in and out by selecting + and -.
- How to find out where you are right now, including co-ordinates and a street address
After the phone's GPS receiver has locked onto a satellite signal, the map should automatically show your current position with a bright red dot in the centre of the screen. However, if the map has moved away from the dot for some reason (for example if you've clicked elsewhere on the map), you can get back to the red dot by going to "Options" and then "My Position". After you've selected "My Position", the map should stay locked onto the red dot so you can watch your progress if you're moving.
To find the co-ordinates and street address of your current position:
1. Make sure the phone is locked onto a satellite signal (the indicator in the bottom right corner will contain at some green bars when it is locked on).
2. Make sure the bright red dot is in the centre of the screen. If it isn't, select "Options" and then "My Position".
3. Click on the parallel lines icon in the top right corner of the screen, and select "Show Details". If there is no street nearby, the map will use the general area's name and post code.
- What does the red dot mean?
If the red dot is a pale colour, it means it's showing your last known position.
If the red dot is bright red and the phone is locked on to the satellite signal (with green bars in the indicator in the bottom right corner of the screen), the dot shows your exact current location.
If the red dot is bright red but the phone isn't locked onto the satellite signal (there are no green bars), the dot shows your estimated location based on the location of nearest mobile phone mast.
- How to send other people your current location (or any other location) by text message or e-mail
One very very useful feature of Nokia Maps is the ability to send other people the address of your current location, telling them exactly where you are. This works through SMS text messages or e-mail, so the other people don't need any kind of GPS equipment in order to receive these messages.
You can also use this method for sending people the addresses of other locations. Just select the location you want on the map and use the "Send" option as explained below.
Here's how to do it:
1. Make sure the phone is locked onto a satellite signal (the indicator in the bottom right corner should contain some green bars).
2. If you're sending your own location, make sure the bright red dot is in the exact centre of the screen. If it isn't, select "Options" and then "My Position".
3. Click on the parallel lines icon in the top right corner of the screen, and select "Send".
4. Select "Message" if you want to send your location by SMS text message, or select "E-Mail" if you want to use e-mail. (Note that you need to have your e-mail account set up on the phone's messaging application for the e-mail option to work.)
5. A warning will appear telling you that some of the message content may not be understood by the other person's phone. Do not worry! All that this means is that the message will include data for use with Nokia Maps if the other person has it on their phone, but if they don't have Nokia Maps they will still see the postal address.
6. Add a recipient for the message in the "To" field, optionally add something to the body of the message if you want to explain what the address means, and then click on the envelope icon to send the message.
- How to save a particular location to your favourites list
Just like bookmarks in web browsers, Nokia Maps has a system for saving favourite locations to a list called "My Places". My Places is very useful because it lets you instantly see locations on the map which you use often, for example you can add the locations of friends' houses, a favourite restaurant, your place of work etc.
To add a favourite location to My Places:
1. Select the place you want to save on the map (make sure its exact location is displayed in the black address bar at the top).
2. Select the parallel lines icon in the top right corner, next to the location's address.
3. Select "Add To My Places".
To select a location in My Places:
1. Select "Options".
2. Select "Favourites".
3. Select "My Places".
Note that favourite places are displayed with a special star icon on the map, so you can distinguish them from general points of interest. See the diagram near the beginning of this tutorial for an example.
- How to search for a particular address (e.g. 10 Downing Street, London)
You can look up the locations of most addresses on the planet using the Nokia Maps database, and look at them on the map or through satellite photos. Here's how to do it:
1. Select "Options".
2. Select "Search".
3. Select "Addresses".
4. Fill in the Country/Region and City/Post Code, and optionally enter the street and street number too if required.
5. After you've finished filling in the form, select "Options", then "Search".
6. All the matches in the database will be shown in a list. Click on a match and then "Show On Map" to see it displayed on the map.
To do something with the location when it's shown on the map (for example save it to "My Places", plan a route to it, or send it to someone), select the parallel lines icon in the top right corner of the screen.
- How to search for a particular service (e.g. the nearest restaurant)
The Nokia Maps database includes a worldwide directory of services and points of interest such as hospitals, shops, fuel stations, restaurants etc. It's basically like a sort of global Yellow Pages. You can search for places near your current location, or near any other location in the world.
Here's how to find a particular kind of service near a particular place:
1. On the map, go to the place where the service should be near. For example, if you want the service to be near your current location, select "Options" and "My Position". If you want the service to be near somewhere else, select that other place on the map.
2. Select "Options".
3. Select "Search".
4. Select "Places".
5. Select a main category (e.g. "Shopping").
6. Select "Search All" if you want to display everything nearby in that category, or select a sub-category if you want to be more selective (e.g. "Food & Drink").
7. A list of results will be displayed in order of their distance from the place currently selected on the map. To show a result on the map, select it and then "Show On Map".
To find out more about a particular service location, select the result and then select "Show Details". To contact a particular service location, select the result and then "Contact".
To save a location to your favourites list, use the "Add To My Places" option.
Important Note: Like all navigational databases, Nokia Maps isn't 100% accurate, and some services may have moved or closed since they were added to the database. There may also be gaps in the database where nearby services aren't listed. Bear this in mind when using the search function.
- How to search for a place which isn't in the database (e.g. Area 51 in Nevada)
Some locations simply aren't listed in the Nokia Maps database, so you can't find them by searching. However, you can still use these locations in Nokia Maps if you can find them manually.
One way to find an unlisted location on the map is to find a listed location nearby, then move the map about until you find the place you want. It often helps to switch to satellite mode, so you can see what's physically there and then zoom out so you can see what's nearby.
For example, the United States' super-secret Area 51 air base in Nevada isn't officially listed in Nokia Maps, for obvious reasons, but it's fairly easy to find its location and photos of the base using Nokia Maps. Here's how:
1. A quick look on Wikipedia tells us that Area 51 is on a dry lake bed near the villages of Rachel and Alamo in Nevada.
2. An address search on Nokia Maps shows that Rachel Nevada isn't listed, but Alamo Nevada is, so select Alamo to be displayed on the map.
3. Switch to satellite mode, zoom out a bit and start examining the dry lakes near Alamo for signs of a base.
4. Hey presto, there it is. You can then select the base and zoom in to see more detail. The parallel lines icon tells you its exact map co-ordinates, and you can zoom in to see more detail.
5. If you want to view the currently selected location later select the parallel lines icon and choose "Add To My Places".
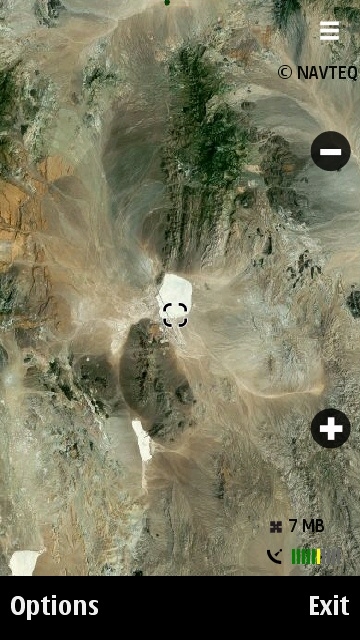
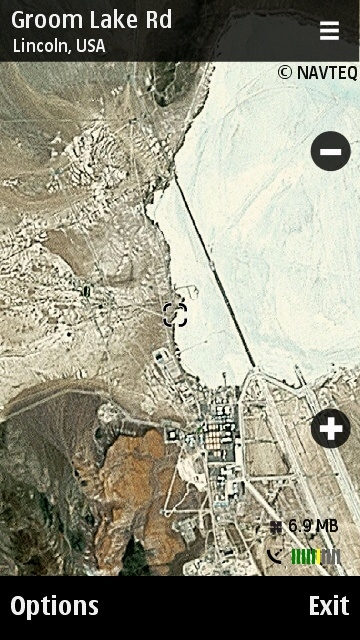
Area 51 as viewed through Nokia Maps
- How to see a history of previously used search results
The 5800 automatically keeps a list of search results which you have recently used. Here's how to view this history list:
1. Select "Options".
2. Select "Favourites".
3. Select "History".
- How to choose which points of interest types are displayed on the map (such as museums, shops, stations etc)
When you're zoomed in on a particular area, the map can display icons for nearby services. You can click on one of these icons and then select the parallel lines icon in the top right corner of the screen to find out more about the service location.
By default only certain types of services have icons displayed on the map. You can change the settings for which map icons get displayed by doing the following:
1. Select "Options".
2. Select "Tools".
3. Select "Settings".
4. Select "Map".
5. Select "Categories".
6. Mark which categories of service you want displayed on the map by highlighting the relevant service and selecting "Mark" from the Options menu. If you want to display all categories, select "Options" and then "Mark All".
7. When you've finished, select "Back" until you get back to the map screen.
- How to navigate by car or on foot from one place to another (aka turn-by-turn GPS navigation)
If you want Nokia Maps to calculate your route from one place to another and give you turn-by-turn instructions, you must have a licence for the on-phone route-planning option. See the "How much does Nokia Maps cost" section above for more details. The licence includes step-by-step navigational voice guidance.
Some phones come with a free licence for 6 months or a year. To check if you have a licence, select "Options", then "Extras", then "My Licences", then "Update". It should display any licences which are still valid.
If you don't have a licence, or you want to buy a licence for a different region, you can do so by selecting "Options", then "Extras", then either "Drive & Walk" (for car and pedestrian route-planning) or "Walk" (for just pedestrian route-planning). You should be able to pay either through credit card or your phone bill.
Once you've got your licences sorted out, here's how to start navigating:
1. Make sure the phone is locked onto a satellite signal (the indicator in the bottom right corner should contain some green bars when this happens).
2. On the map, select the place you want to get to (for example by using the search function).
3. When you've selected your destination, select the parallel lines logo in the top right corner of the screen.
4. Select "Walk To" if you want to navigate on foot, or "Drive To" if you want to navigate by car.
5. The Nokia Maps layout will temporarily change to make the phone easier to use during the journey, and arrows will appear telling you which way to go. Note that the driving navigation layout provides three alternative layouts in the "Views" menu, and the "Options" menu becomes a grid of large short-cut icons during car navigation.
6. If you want to ask for an alternative route, select "Options" and then "Different Route".
7. Start following the on-screen or voice instructions until you reach your destination.
8. When you've finished navigating, select the "Stop" option.
Important Money-saving Tip: If your phone network charges a lot for data use, you may want to preload maps onto your phone from your computer, so that you don't have to download any maps on the way. You can do this by downloading and installing Nokia Map Loader on your computer.
- How to find out traffic information
There's an optional premium service called Traffic Info which tells you about current road restrictions, accidents, congestion etc. Like on-phone route-planning, Traffic Info requires a licence to work.
You can access Traffic Info by selecting "Options" and "Traffic Info". If you don't have a Traffic Info licence it will present a set of instructions on how to purchase it, either through your credit card or your phone bill.
- How to change the map colour scheme
By default the map uses a daytime colour scheme, but you can switch to a darker night-time version if you prefer. Here's how:
1. Select "Options".
2. Select "Tools".
3. Select "Settings".
4. Select "Map".
5. Select "Colours".
6. Choose the colour mode you want.
7. When you've finished, select "Back" until you get back to the map screen.
- How to take a screenshot of the current map screen
If you want an image of the current map view:
1. Select "Options".
2. Select "Tools".
3. Select "Save Map Screen Shot". The image will be saved to the phone's Gallery section.
What is Ovi Maps, and how does it relate to Nokia Maps?
Ovi is the general brand for Nokia's online services, and Ovi Maps is Nokia's map-related website. You can use Ovi Maps to explore the same map data as Nokia Maps but through your computer's web browser. Ovi Maps also lets you calculate routes on your computer free of charge, and synchronise the routes on your computer with the routes on your phone.
The upcoming new edition of Nokia Maps, version 3.0, should integrate the two services even more closely.
Can I use an alternative to Nokia Maps?
Yes.
The Nokia 5800 runs on the Symbian S60 platform, so anyone can publish a satellite navigation application for the phone, and you can install a third party navigation application on the phone if you want.
An example of a third party sat nav app is Garmin Mobile XT, which should work on the 5800 and uses the same interface as Garmin's dedicated GPS devices.
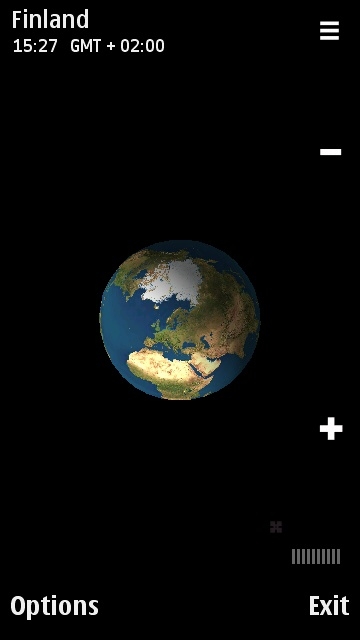
This is what you see if you zoom all the way out on Nokia Maps.
Click here for a complete list of All About Symbian's Nokia 5800 XpressMusic tutorials
