Note that, although I was using my N8 for this exercise, the same steps apply to any other similar Symbian^3 generation phone, e.g. Nokia C7, C6-01, E7, E6 or X7). Note also that we take no responsibility for lost data should you go through all this and something go horribly wrong!
Also note that if your phone is working perfectly but if you're just low on disk space then use this tutorial of mine instead. But, assuming you're seeing gremlins, then here then, is what I did, step for step. If you've been putting off rebuilding your Symbian smartphone then maybe the break down below will help you - just work through it in your own time!
- Charge the N8 (/other phone) fully.
- Perform your usual personal data sync/backup. If you haven't been backing up your Contacts and Calendar then stop now, it's a recipe for disaster for someone like you to attempt most of what follows! At the very least, backup these two data types to microSD using the menu options in 'Files' on the phone.
- Do any data syncs, i.e. for third party applications. For example, I use Handy Safe Pro to keep all my secrets safe and I did a sync with Handy Safe Desktop, ready for syncing it all back later. Another example would be to sync your Opera Mobile bookmarks with your account on Opera's servers.
- Go into Nokia Maps and into the search/favourites section - do a full sync of your favourite places with the Nokia Maps server.
- Export your Podcatcher feeds to an OPML file on microSD (so that you can import this later on and not have to find all your feeds all over again)
- Check that all your captured media (photos, videos) is backed up/archived, e.g. onto your desktop or laptop computer - the mass memory will get wiped as part of this rebuild, so you'll lose anything you haven't saved or copied off.
- Set the N8/phone in 'offline' mode.
- In the homescreen dialler, type *#0000# and check for firmware updates (you never know, something may have just been released!)
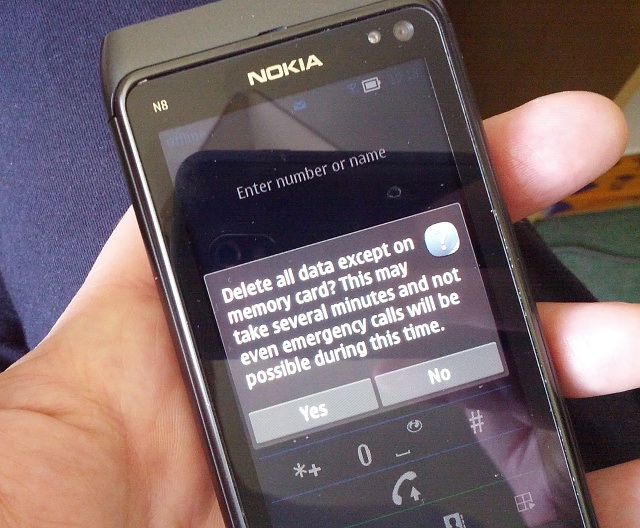
- Also in the dialler, type *#7370# and say 'Yes' to the reset. Note that you won't lose any firmware updates, i.e. this will take the phone back to a state as if you'd just relaid the latest firmware onto a virgin phone using Nokia Suite.
- Wait. And wait. Don't panic, the reset/wipe took 15 minutes for me. Yes, that's a long time, get over it!
- Sign into your Nokia account (the phone will be using your cellular data at this point, but don't worry, it doesn't use much).
- Skip setting up email and transferring contacts - after all, this is a rebuild, you're not moving from another phone. And you can sort out email later on.
- Set the right date and time, as offered.
- Go into Settings/Connectivity/Wi-fi and set up your Wi-fi network again. Phew, now the heavy lifting can be handled without needing cell data. While in these dialogs, double-check in Settings/Connectivity/Settings/Network destinations that your cell data destinations are correct - usually there are a few bogus ones loaded from your SIM. Delete them and correct as needed. What do you mean, you don't know what your cell data APN is? Time to Google it and learn!
- Head back out a bit to Settings/Phone and set up your display preferences again - I like my 'Brightness' turned up to maximum.
- As a reference point, check the free space on disk C: in Files - mine was 126MB free. Note also that disk E: has indeed been cleared by the reset.
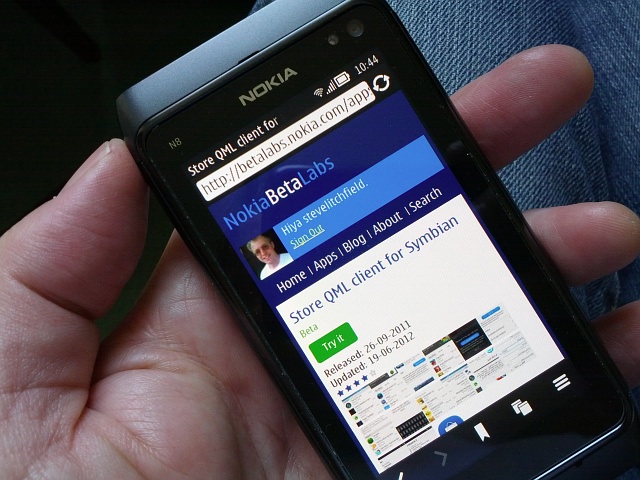
- Go into the Nokia Store and sign in, make sure this is all working - if it is then you're on the home straight. In fact, mine was stuck at the Qt loading screen, so I went into Web and headed for betalabs.nokia.com - the latest QML Store beta installed first time and brought the newest Store client up for me. (Note that I opted for the full 22MB installer, including Qt 4.7.4, just in case!)
- Once signed into the Nokia Store client, double-check your installation preferences are set to E:*
* though advanced users will know that low level utilities and themes are best installed to C:, necessitating a quick change of install destination for these. But let's not complicate things further at this point. - Wait a minute or so and see what application updates pop up (in my case, just the recent VPN one). Install any that you see. Leave the Store client. You can come back here later.
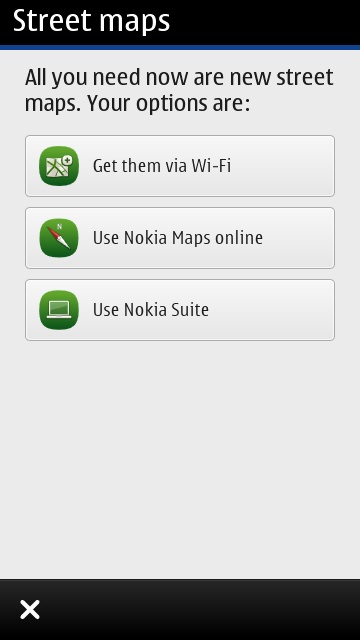
- Head into Nokia Maps and you'll be prompted to download maps by Wi-fi or to use the application online. You'll be 'online' anyway most of the time, but you can save yourself a lot of data bandwidth and time in future by picking your country now and leaving the phone for 15 minutes to download and install all roads in your current country to the phone's mass memory. Just go off and make a cup of tea or coffee - you'll reap the rewards of this preloading every time you're mobile and need to navigate.
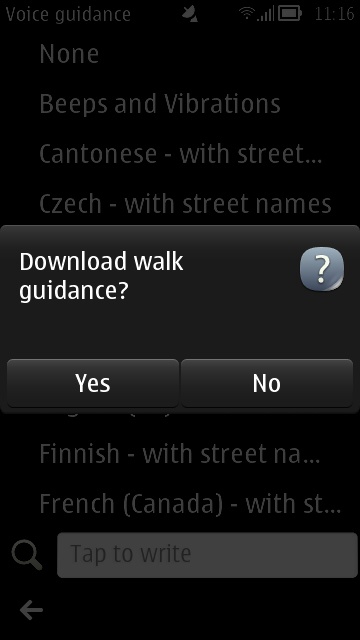
- Exit Maps, start it again and heading into '...' and 'Settings'. Tap on 'General' and then on 'Connection', to make sure this says 'Online'. Although Nokia Maps and navigation will work totally offline, it's best to have some data connectivity arranged as you get much better search results. Tap back and then on 'Maps and Walk'. Choose a 'Voice guidance' language, e.g. "English UK with street names" and wait a minute while this is downloaded. Again, best to do this on Wi-fi, nice and quickly, rather than have to do this over cellular later on. Tap back and then again on 'Drive' and pick a voice guidance language again. If this is the same as for 'Walk' then it won't be downloaded and installed all over again. We'll leave further Maps customisation for another article.
- While in Nokia Maps, go into the search/favourites section and sync your 'Places' back from the Nokia Maps server.
- Before going any further, it's best to get your PIM (Contacts, Calendar, etc) data in place. After all, if this is your main phone then you may be itching to be off and doing something else by now. You'll already have your favourite PIM syncing method, of course. Many people sync data through Microsoft Exchange to the likes of Google and Gmail, some sync locally to Outlook on a Windows PC. For the record, I sync via Bluetooth through iSync to my Mac's Address Book and Calendar (and the latter two both then sync up to Google). I'll let you set this up in the usual way for your own preferences - all I had to do was turn Bluetooth on in the phone and then tell my Mac to 'set it up' again as a new Bluetooth phone. Your mileage will vary slightly here, of course.
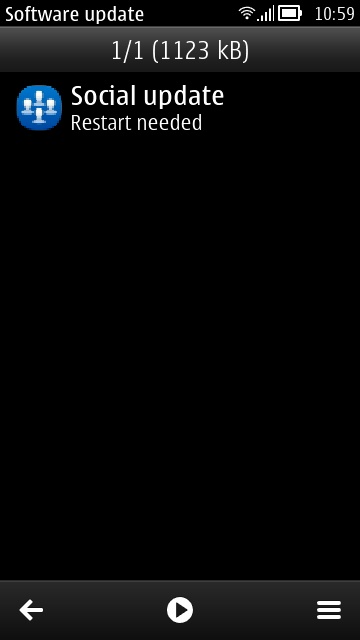
- Nearly there now, in terms of having a usable smartphone again. Check Sw_update on the main app menu for other OS components which might need updating - in my case, 'Social update' - even though I'm not going to be using Social much, there are some benefits in getting my social accounts known about by Symbian and Social, ready for quick sharing from Gallery and who knows, maybe Social will get another update sometime and get better? You don't have to install or run it, but I thought I might as well have it up to date just in case. Besides, having now synced on all my contacts, there are some tie-ins between the Facebook component in particular, in terms of grabbing Facebook photos for common contacts. If you do install and run Social, allow a few minutes for the system to settle, as there are background threads doing the contact linking.

- Use the provided email wizard to set up your usual Gmail/Yahoo/Exchange email account, as needed. Give it a few minutes to grab the last few hundred emails/headers - don't rush the setup process.
- All that remains is the 'fun' stuff. Install your most needed applications (do try and resist to re-install everything under the sun this time!) from the Nokia Store.
- Having reinstalled third party apps that need data synced or imported (e.g. Handy Safe Pro and Podcatcher, mentioned above), you'll obviously need to do this as well after installation. In Podcatcher's case, use 'Import feeds' on its menu).
- Go into Music player and, if your microSD-stored music isn't immediately displayed, use 'Refresh library' on the menu.
- Rearrange your icons into any needed folders (e.g. 'Rarely used', 'Games', and so on).
The reinstalling of third party applications from the Store (or via side-loading from your desktop) can take an hour or so, but it's something that's easy to do while watching TV or similar, so it doesn't have to dominate your time.
At the end of all this, you'll have a smartphone that runs faster and smoother, you'll have vastly more free disk space and you'll have peace of mind that your phone is free of thousands of small bits of OS and application detritus.
PS. Of course, there are other ways you can show tender loving care to your smartphone in giving it a spring clean. What about a new theme? What about sourcing a new battery from a reputable seller on Amazon and starting 'afresh' with maximum capacity?