Lifeblog is the multimedia diary software from Nokia that was announced around the same time as the Nokia 7610. The principal behind it is very simple - it allows viewing of multimedia items (video, images, text messages, etc.) in a timeline view, allowing you to create a visual and audio record of your life from day to day. Items are displayed by date in thumbnail size and you simply select them to view them in a larger size. It is deceptively simple, but suprisingly effective.
 In this feature I look at the Lifeblog software, but also the concept because both are worth examining. It's not really fair to review the software at this stage because it is still in beta (and in places this shows) which is why this is a feature on Lifeblog rather than a review. Of course there are a few comments on the software itself...
The name Lifeblog might suggest traditional blogging to a lot of people, and although Nokia did recently announce a tie in between TypePad and Lifeblog, this is not a blogging tool. You might see it as creating your own personal media blog on your own PC, but its not something you can share with the outside world via the internet (though there's a hack to get round this, of which more later). It is far better to think of Lifeblog as a diary that creates itself. Indeed you might want to view it as the lazy man's electronic scrapbook/photo album because most of the work is done for you. You need to take the pictures, get them into Lifeblog and then site and admire them.
Lifeblog comes as two elements. A program for your phone (which displays items currently on your phone) and a PC component. The PC component is the main store and you sync the two together to transfer images. The phone program can be thought as a temporary stores where media resides before being transferred to your PC. The phone program works in a similar way to the PC - it's main view is a timeline display - and you can do most things on your phone that you can do in the PC version.
The idea is that you use your phone (currently supported are the 7610, 6630 and 6670) to capture the media that then goes in your Lifeblog. Material is transferred from the phone by a syncing process (it has it's own conduit, but uses the same connection as PC Suite). However it is well worth noting that this is not necessary. Thanks to the 'Import from PC' option on the File menu you can bring any .jpg and certain video file into the program. Thus can use Lifeblog with media from any source (this is particularly handy if you either do not have a compatible phone or have both a phone and a digital camera). I found that this also worked well with my stored Nokia 3650 and Sony Ericsson P900 images.
Digital media generally has creation dates embedded within the file and as a result any data you move into Lifeblog either via syncing with a phone or by importing will get put in the right place in the diary.
The reality of course is that this is going to get most use from people who actually own one of the supported phones, and this is, of course, where Lifeblog is strongest. During the syncing process Lifeblog also transfers your text messages and these are added to your Lifeblog as text notes. This can lead to rather strange combination of SMS messages and pictures, but it does add another layer of 'life recording' and its not difficult to remove text notes. The syncing process removes all items from your phone, which is a bit disconcerting the first time it happens and it would be nice to have a few more options to control this (for example leaving messages that are less than a week old).
You can get items back on to your phone by placing them in the favourites folder. This is a folder which has the same contents on the phone and on the desktop. Its a neat way of storing your favourite photos so you can show them off to people. They are not removed from the main Lifeblog view, but rather are tagged as favourites. I've been using this feature to keep tabs on my favourite images (even with the timeline feature after a few hundred pictures has been added its difficult to keep track of what's where) and also so I can carry a copy of them around on my phone.
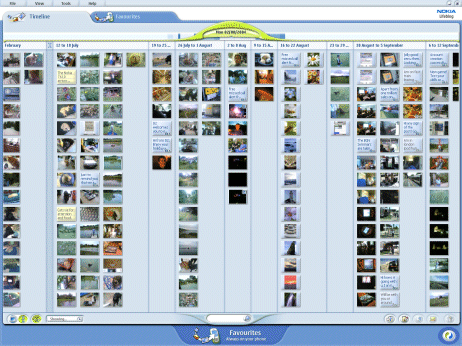
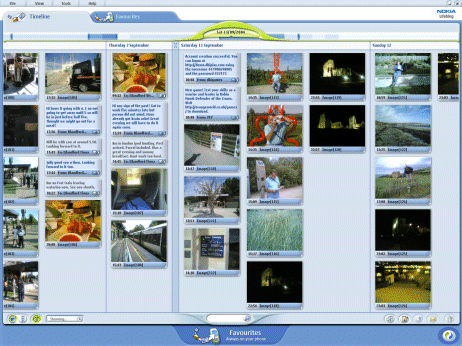
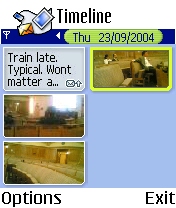
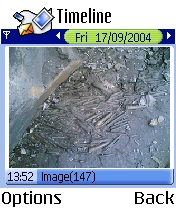
The PC application is a relatively basic program. That's good in one way because it means it is not difficult to use, but I'm sure power users will be left wanting more. The timeline view (as shown in the first screenshot) is a great way to view the images, and that is the strongest feature of Lifeblog on the PC. From the main view you can choose to go to a particular day (very useful as your collection grows) or simply scroll back and forth. You can choose to see the thumbnails in a normal size (see the first screenshot) or a small size (see the secod screen shots). You can also Import items from this view. It is also from here than you can add text notes. This allows you to add as much or as little text as you like. If you have an item highlighted at the time the note will get associated with that item. This means you could add text diary entries if you wished. I haven't really done this, but instead used it to make small notes about various photos (such as location). A handy feature that does not have a menu entry is the 'E-mail this Item' button which is in a toolbar on the bottom right of the main view. Clicking this button will pop up your default e-mail client with the item in question already attached. Its a nice way to share items with others. By holding down the Ctrl key and then selecting items it turns enables you to select multiple items all of which can then be sent attached to the same e-mail (yes it took me a while to discover this!). This multi item select also works for other options too such as changing the date, deleting and rotating images. The toolbar is split in two by a search box which you can use to search for items in your Lifeblog.
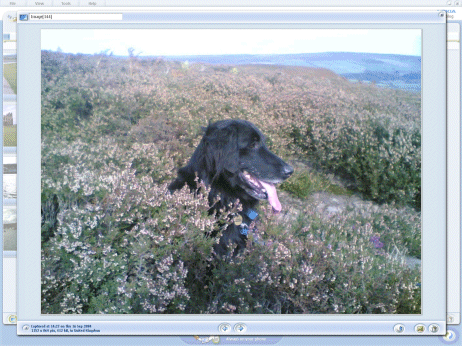
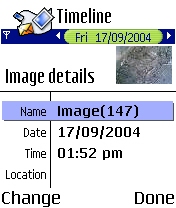
By double clicking on an item you pop up another window which is the item view. Two arrows at the bottom mean you can quickly move back and forth between images. This is also the only place in the PC to rename images (and it is not that obvious either), the white box at the top contains the image name and it is an editable box. This user interface oddity is an example of some of the problems you'll see throughout the program in this beta and is one of the things I hope gets fixed. As a result of this renaming is a bit of a chore and consequently the search box in the main view is not as useful as it might be.
Another example of the quirkiness is the fact that when you make changes (or indeed add a text note) there is no apparent save button (it happens automatically). The only way to close the item view is to click to x button in the top right hand corner. It just doesn't quite fit in with what you expect from a Windows program. The lack of a right click context menu is a further case in point. It would be far quicker if rotation, renames, deletions etc could be done from a context menu, but this is completely missing from the program. It is this kind of thing that gives the PC program it's beta feeling (not surprising since it is a beta!).
I'm also not convinced by the windowing used by the program. It takes up the full screen (including the Windows Start Bar) and uses custom UI elements (as shown in the screenshot below). I'm not very keen on that kind of thing. Perhaps Nokia are trying to create a simple to use 'experience', but I'm not convinced that this works.
On the other hand the program has been very stable for me and I haven't had any crashes (and more importantly not lost any data). I know others have, but that has more to do with the connection itself rather than the software. For the Nokia 7610 at least it is easiest to use the cable as this gives better transfer speeds.
As mentioned previously the power user is going to be looking for extra features - things such as keyboard shortcuts, backups, better editing features, printing, categorisation, slide shows and support for more media types spring to mind. Of course actual weblogging integration would be nice too and that looks to be on the way - let's hope it is more than just Typepad. Hopefully this is something Nokia will address in the release or future versions. There's lot of potential for features in image cataloguing type program, but it is going to be important not to overwhelm the user.
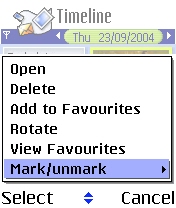
The Lifeblog app on the phone is more polished than the PC program. You get very similar functionality (deleting, renaming, rotating, viewing etc.) and the program follows the Series 60 style guide so it behaves and looks like a built in program. The timeline view works well despite the lack of screen space and is a very usable alternative to the built in Image program. Indeed it makes a lot more sense having photos stored in one place and sorted by date (and as an aside Nokia have a rather nice Gallery alternative that does this if you do not what to use Lifeblog).
The Favourites part of the Lifeblog app on the phone is the best way to keep images that you want to show off, and after a while you can build up a mini version of your PC based multimedia diary by selecting items regluarly for tagging as favourites. A part of me wishes you could keep everything on the phone, but for most people memory would become an issue fairly quickly.
It would be nice if there were a few more options in the phone app. I would like to be able to select which folders it scans for new images. As it is it picks up everything within the Images folders in the internal memory and on the memory card. This means it is somewhat tricky to store images outside the confines of Lifeblog. I ran across this problem when making screenshots for reviews.
Overall though the phone app is to be recommended, and is worth using even if you don't intend to use the accompanying PC software because it gives you an alternative to the Images app that comes with the phone. Viewing pictures and media by time really does give you an impressions of a story of activity.
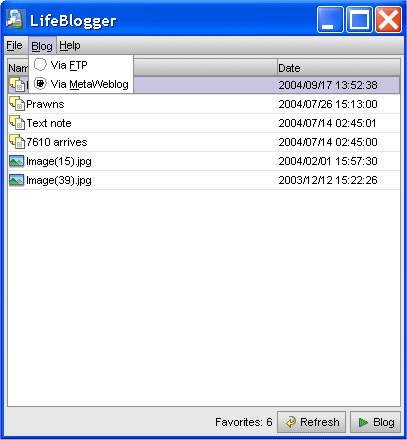
Although Lifeblog is not a blogging application there is an obvious potential feature. Typepad integration is coming in 2005, but if you want to start blogging with Lifeblog now you can use Lifeblogger by Erik Thauvin which is a Java program which allows you to post files from your favourites folder to your blog. This is possible partly thanks to the 'hackable' nature of Lifeblog. It uses accessible standards and file store so you can expect to see more add ons in the future. Lifeblogger itself works well and for those wanting to get pictures onto their blog it will serve you well.
So we've looked at the software, and overall it is very good. There is some work to be done on the PC part, and it would be nice to see some additional features, but I'm sure that is something that will come in time. Perhaps the more important question is - does the concept work? The answer - yes!
I was largely sceptical about the program before I started using it on a regular basis. Sure I have used phones ofr taking the odd picture, but I hardly qualify as a super camera phone user. I suspect I fall into the category that most people do - the occasionally user who takes pictures only on the odd occasion. Those picture which I did take tended to store on the phone for ages, and even when I did take the time to transfer them off they tended to sit, lost, somewhere on my hard disk. On top of that the idea of a multimeida diary seem, well, a bit naff.
However once you start using the program you really start to appreciate the concept. It's only then that you appreciate that this program allows for much greater use of your phones media capturing tools. This is because it facilitates easy transfer, easy storing and most importantly easy viewing on the PC. The concept of a multimedia diary is suddenly a lot less naff when you use it as a record of what you've been doing, or to show photos and videos off to friends. Instead of loosing pictures somewhere on your hard disk they are readily accessible.
I found that I actually started taking more picture (thinking, 'got to record this for...'), and as a result I now have rather a nice record stretching back about 3 months of the things I've been up to. Of course some things get more coverage than other (see on of Echo the dog regular entries above). People also feature heavily - partly because the phone seem to be best at that sort of photo and partly because one of the strongest uses is recording a 'face-roll' of the people you meet.
Of course the fact that phone go with us everywhere is going to be a great strength. Unlike other media capturing device you are nearly always going to have your phone with you. The ubiquity of mobiles usage ensures this, and this means attaching media capturing to phones suddenly makes a lot more sense. People were sceptical about cameraphones, and still are, but this is the sort of usage that I can see making them even more popular and moving them away from the bit of fun - share a picture with pissed mates in the pub - to something that lasts a bit longer.
The Nokia 7610 with it's megapixel camera is the ideal phone to go with Lifeblog. I feel you do need the higher resolution pictures to get the quality that makes keeping a multimedia diary worthwhile. More to the point Series 60 user friendly nature makes capturing media a whole lot easier than some of the other phones around where it can be a bit of a tortuous process.
There is one problem for Nokia. I think a lot of users will be like me and be a bit sceptical. I think getting users over the entry barrier is going to be the Team Lifeblog biggest problem. Once they get them using the program a lot of people will find it becomes another part of their phone's toolkit. But how to get that initial use? That's an interesting question and the challenge ahead for Nokia. It is going to need good marketing, word of mouth and time.