Thanks to the lads at SMS Text News for reminding me (and others) about the ability in the camera software in all recent S60 smartphones to do image sequences.
Why sequences? Well, they're a good and automatic way to show something changing, pictorially, over time. String the images together and you've got a so-called 'time-lapse' video. In the example below I was trying out the idea on a bus journey into town, but it could equally well be your garden - or the setting up of an event - or a landscape, in each case animating a much longer period of time. For example, the bus journey was 15 minutes and the video takes only 20 seconds.
- Start up the camera in your S60 smartphone and use 'Options | Settings | Image quality' to set the resolution at what you'll need for your finished video - there's no point in grabbing hundreds of 5 megapixel images when they're all going to be scaled down to QVGA etc - wasting disk space and processor time at each end.
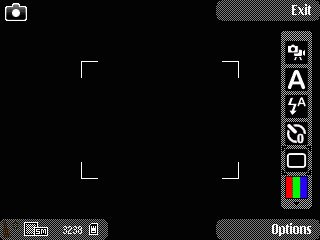
- Scroll down the right-hand-side icons until you get to the one looking like a TV screen. That's sequence mode.
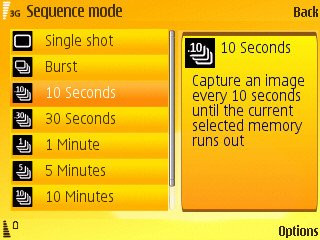
- Press in the d-pad and you'll see the other screen below.
- The delay you choose depends on what you want to photograph and how long you want the finished video to take, i.e. on the effect and story that you're after. I plumped for every 10 seconds - in retrospect, Burst mode - where the camera takes photos as fast as it can, every second or so, would have produced something smoother. But hey, I was just proving the technique. 8-)
- Set your camera up somewhere stable and consistent. Ideally on a tripod or hard object, so that the subject remains steady. In my case, the subject was constantly changing of course, so the exact positioning wasn't that important, but this won't usually be the case.
- Press the shutter button to start shooting in your chosen sequence mode. (Note that Burst mode requires you to keep holding the shutter down, while all the others are properly hands-free)
- Having finished your sequence, minutes or hours later, use Nokia Image Store (or similar) to get the images onto your desktop's hard disk.
- Drop the images into any video editor (it doesn't have to be particularly fancy), select them all in the timeline or storyboard and set their duration to be a quarter of a second or so. The duration can be less if you took more photos and can afford for smoother playback while still keeping the finished movie a sensible length.
- Export the finished movie and do what you want with it (in this case, uploading it to YouTube).


Why not comment here with the URLs of any time lapse, sequenced movies you've created on your smartphone?
Steve Litchfield, All About Symbian, 5 June 2008
