It's tempting to think of the cameras in the Nokia N90, the N73 and the N93, as just flashier versions of the hardware in the likes of the N70, 5500, N71 and E70 (to name but four models with two megapixel cameras). But the presence of a proper focussing lens, together with more control of exposure, makes a huge difference and different rules apply.
In one sense, taking good photos is much harder, as you can rarely now 'point and shoot'. On the other hand, the final results can potentially be far superior, especially if photographing something fairly close. Helping you up this learning curve is what this tutorial is all about (and thanks to this post on the Symbian Freak board for inspiration).
The cameras

From left to right: the Nokia N90, N73 and N93 (with 3x optical zoom as well)
Four steps to better photos
- Firstly and most importantly of all, just as with my article on video recording, light is everything. It's photons of light that trigger charge in the camera's sensor, and the more of them the more accurate the reading from each sensor pixel. In good light, there's more than enough information being gathered and your Nseries camera will produce results comparable to those from standalone cameras. In poor light, either in the evening or under flash conditions or in a dimly lit room, there simply aren't enough photons hitting each pixel for the sensor to be absolutely sure what value to report, which is why you get 'noise', flecks of random colours in your photo. In a standalone camera, the sensor pixels are bigger and each gathers in more photons, so you don't notice the same degree of noise.
It's also worth noting that you may also have problems in very bright light with any digital camera, as photons 'overflow' from one pixel to the next, with the result that you sometimes see 'smearing' around bright sections of the image.
Be aware of the light conditions at all times and try to anticipate the effect the level will have on your Nseries camera. It also goes without saying that the obvious rules of photography apply, such as not shooting towards the light source unless you're trying for a special effect.
On the N93, understand that using the optical zoom will decrease the amount of light getting to the main sensor, so only zoom in if you're confident there's enough light to cope.
A zoomed in night image showing the typical random coloured flecks of digital 'noise'.
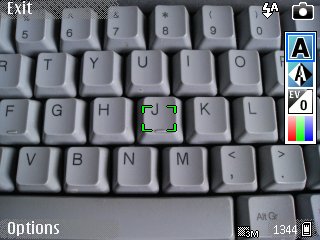 Next, understand how the autofocus system in these Nseries devices works. The image within the central graticule is sampled many times a second when you slightly depress the shutter button, with the lens moving backwards or forwards in an attempt to maximise the contrast of edge detail within the graticule. Now, this system normally works well enough, but it can fall down if there's not enough light (see point 1. above) or if the object in this part of the image doesn't have any detail that's suitable for contrast sampling.
In this case, it's best to move the centre of your composition slightly, to something that's the same distance away but which has better detail. Once focussing has been achieved on this, you can keep the shutter partially depressed and move the image centre back to the original subject, before finally pressing the shutter all the way down.
For typical 'point and shoot' landscape shots, where there's no real close-up foreground, the auto-focus system will probably make a mess of things, so make sure you change the shooting mode to 'Landscape', in which the auto-focus is disabled and the camera behaves just as that in an 'infinite focus' lesser device, such as that on other camera smartphones.
A typical scene, zoomed in, showing the horrible out-of-focus effect if you forget to use 'landscape' mode when there's no foreground subject to focus on.
- Take a little time (if possible) to think about adjusting the settings from 'automatic' values. For example, using 'Night' as the 'Shooting mode' forces the camera to use a longer exposure time, thus letting more photons in and reducing noise, at the expense of blurry images of anything that's moving - or the whole scene if your hand isn't steady enough when pressing the shutter button. 'White balance' is also worth fiddling with if you've got the time to set a shot up properly - colours seem different under different lighting conditions and this is your chance to allow for this factor. Finally, 'Exposure value' is invaluable if you like playing around with light, perhaps shooting into a bright light (decreasing the exposure value) or trying to pick a dark subject out of a bright background (increasing the exposure value). By default, your Nseries camera software will try and average out the light intensity across your image, which is often not what you actually want. In each case, adjusting the exposure by a couple of stops can make a big difference and give you more control.
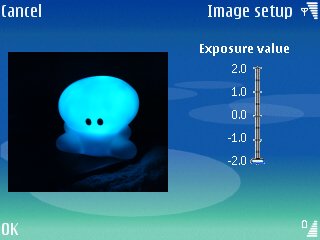

An example of knocking down exposure when focussing on a bright subject.... and what happens if you don't put up the exposure when trying to focus on a dark subject in a bright environment...
- Learn to press the shutter properly. First of all, there's shutter lag, which is quite well known. Having pressed the shutter button, there's a lag of up to second while the exposure level is calculated and implemented, so learn to allow for this in terms of composition and in terms of staying 'in position' for a second or so after pressing the button. In addition, the shutter will be 'open' (whether it's a mechanical shutter (as in the N93) or an electronic one (as in the N90) for a specific duration (e.g. 50 milliseconds) and if you're moving the smartphone during this time then your photo will have a degree of blur. So it pays to brace yourself (hold the smartphone in two hands, stand with your legs apart and hold your breath momentarily) and gently 'squeeze' the shutter rather than stabbing at it.


The difference between not bothering and taking care to hold the Nseries smartphone steady for a second or two after squeezing the shutter button...
Over and over again, I see people complaining about picture quality or, sometimes, simply presenting poor photos. None of these Nseries auto-focus cameras are perfect and, to be honest, none are as good as a top standalone camera, because of the degree of miniaturisation needed, but used with care you can achieve some very respectable results.
Hopefully learning the four steps above improve your still photography.
Steve Litchfield, 19 December 2006
Bonus link: Improving your N93 video recording