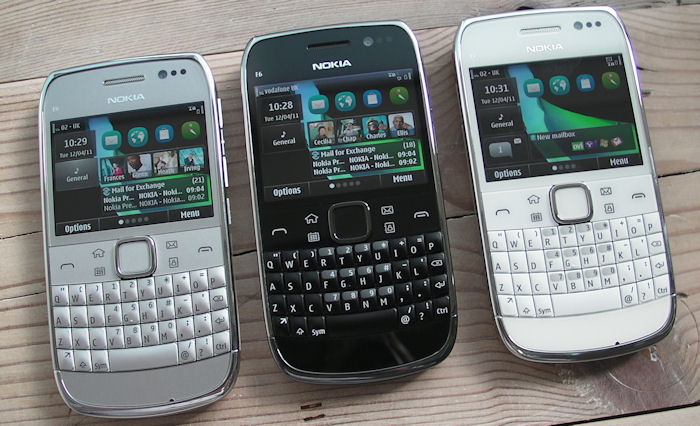
Three Nokia E6s, all running Symbian Anna - note the widgetised grid homescreen, easily navigable and actionable using the d-pad....
A warning from me (Steve) before you read beyond this point. Flashing firmwares is never trivial. Flashing multiple times in arcane combinations is almost suicidal - what follows is legally 'grey', is time consuming and dangerous. Really. And you'll need to be something of a Windows/PC expert to handle all the app, file and folder juggling.
In addition, the notes about disabling anti-virus are important from the point of view of running flashing software, but DON'T do this until you've grabbed all the files you need from the links - it's so easy to get distracted and click on an 'ad' in file sharing sites, so best go in with full malware defenses 'up'. And remember to re-enable anti-virus software after all operations are complete!
Matthew Kuhl writes:
Downgrading the E6-00 from Belle to Anna, or from Belle Refresh to Anna or Belle
This write-up is based on the original tutorial by luis12luis on the Daily Mobile Forum post found here. All credit for the procedure must be attributed to him. There is a two-part video tutorial on YouTube by Uebertragungswagen, embedded below for reference, that has English subtitles, but the computer’s language is German so it can make a good visual supplement to this English version text below.
Feel free to email me (link above) for assistance with the procedure or file sourcing. The downloads you'll need:
- Phoenix Service Software 2010.38.005.44210
- Phoenix Service Software 2011.46.002.47246
- N8 RM-596 v25.007 Firmware (the last N8 Anna firmware)
- N8 RM-596 v11.005 Firmware (the lowest N8 firmware)
- E6 RM-609 v21.013 Firmware (the lowest E6 firmware)
- E6 RM-609 vXX.xxx Firmware (the desired firmware, which can be found at mrcrab.net)
A basic knowledge of Phoenix Service Software is highy recommended for anyone who has never used it before. All flashing carries the risk of bricking your device, so proceed with utmost caution. Most of the time, a failed flash can be recovered by flashing the latest firmware in Dead phone USB flashing using SW Reset. Apologies for the file locations and language in regard to settings as I use Windows XP. Please translate where necessary for Windows 7 users.
The basic overview is this: Phoenix 2010 will be used to flash the N8’s final Anna firmware and then the first S^3 firmware, then Phoenix 2011 will be used to flash the lowest E6 firmware available and then the desired firmware. These steps must be followed precisely, or it will not work. Many have bemoaned/questioned the necessity of two versions (or these specific versions) of Phoenix, but this is how it works.
Before flashing, the Data, Private, Resource, Sys and System folders must be deleted from the mass memory. This can be done easily with the phone switched off and connected to the PC.
The first stage:
- Kill all antivirus/malware apps and engines. i only use Microsoft Security Essentials, so i can only share the nuance of this engine which is that in Task Manager, msseces.exe (Security Essentials’ GUI) must be killed, followed by MsMpEng.exe (the antivirus engine) three times before it finally gives up its fight.
- Install Phoenix 2010 and continue the installation when Windows states the software has not passed the Microsoft Shield certification.
- For those who have used Phoenix previously, there should already be an RM-609 folder where their firmware files are stored. If there are any existing files in it, delete them or save them elsewhere. For those who have not, there will need to be a folder named RM-609 created in C:\Documents and Settings\All Users\Application Data\Nokia\Packages\Products\ (WinXP), C:\Program Files\Nokia\Phoenix\Products\ (Win7 32bit), or C:\Program Files (x86)\Nokia\Phoenix\Products\ (Win7 64bit)
- Into this folder, extract the v25.007 N8 firmware.
- With the phone switched off, connect the USB cable. Windows will detect the device and install the flashing cable drivers for it.
- Switch the phone on and go to the System Properties menu by right-clicking on My Computer and selecting the Properties menu, or opening the Control Panel and selecting System.
- Click on the Hardware tab and open the Device Manager.
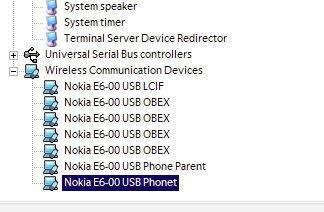
- Scroll down and expand Wireless Communication Devices.
- Right-click Nokia E6-00 USB Phonet and select Update Driver...
- Select Install from a list or specific location (Advanced).
- Click Don’t search. I will choose the driver to install.
- Deselect the Show compatible hardware option and scroll down the list to select the Nokia N8-00 USB Phonet.
- After the drivers are installed, exit Device Manager.
- Turn the phone off again and Windows will detect it again (as an N8, this time) and install the flashing cable drivers for it.
- Remove the battery and USB cable and open Phoenix again.
- The Connections: dialog box should be NO CONNECTION.
- Select File > Open Product > Nokia RM-609.
- Select Flashing > Firmware Update.
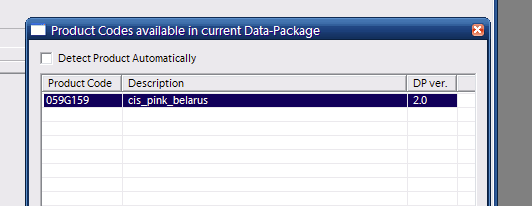
- Select Product Code: ... and select the cis_pink_belarus firmware and click OK.
- Tick the Dead phone USB flashing box in the Firmware Update menu, then click the Options box.
- Select the red emmc.fpsx file and delete it. Confirm and exit the menu.
- Click the Update Software button.
- When Phoenix opens a dialog box prompting you to disconnect the USB cable, connect the USB cable, insert the battery and click OK. The flash will proceed on its own from here. The Firmware Update dialog box will give you information about the programming status and an error message about the NAND memory’s error (the E6 has a much larger memory than it is expecting for the N8), but proceed to tell you the flash succeeded. Although for our purposes it has, in reality it did not. Your phone is now bricked, so do not bother turning it on.
- Remove the battery and USB cable.
- Close the product from File > Close Product.
- Close Phoenix.
- Open your RM-609 folder and empty it.
- Extract the v11.005 N8 firmware into the RM-609 folder now and open Phoenix again.
- Following the same steps as before, open File > Open Product > RM-609 and go to the Flashing > Firmware Update menu.
- Product Code: ... Select SCANDINAVIA DG and there is no need to remove any files this round.
- This time, use SW Reset to flash. When prompted to remove the USB cable, connect it and replace your battery. Click OK and the flashing will proceed on its own.
- After Phoenix reports about the successful flash (nope, the phone is BRICKED as before!), close the product again and exit Phoenix.
- Remove the USB cable and battery.
- Now uninstall: Fuse drivers, Nokia Service Tools, Phoenix Service Software, PL-2303 USB-to-Serial
The second stage:
- Restart your computer and again you will have to kill msseces.exe and thrice MsMpEng.exe.
- Install Phoenix 2011, again continuing the installation when Windows informs you it has not passed the Shield certification.
- Empty the RM-609 folder and extract the v21.013 Ukraine E6 firmware into it.
- Open Phoenix, connect the phone and insert the battery. Windows will install its drivers and when it is finished, remove the battery and USB cable.
- Open Product > RM-609 again and select Flashing > Firmware Update. This time select the Ukraine Black firmware, Dead phone USB flashing, remove the emmc.fpsx content and flash using Refurbish.
- This time, after the programming is completed you will get a new message in the programming dialog box informing you that Phoenix is not able to verify communication to the device and will begin to count down from 25. At the end of this, Phoenix will inform you that the phone has failed to respond and ask if you would like to recover the device.
- Cancel and disconnect the phone.
- Turn it on and go through the basic set-up. Connect it to the computer and open the Device Manager and go back to Wireless Devices and manually change its Phonet driver back to E6-00 (it will automatically select it for you) and Windows will restart to finish the installation.
- When Windows comes back online, kill msseces.exe and MsMpEng.exe (3x) again and empty your RM-609 folder. This time, load it with your personally selected firmware files (I am using v25.007 Euro1). It is not worth downloading the Mass Memory content, as it is only maps data which is outdated now. If you elect to omit these files, remember to remove the emmc.fpsx content in the Options menu prior to flashing.
- Open Phoenix and work your way back through the flashing preliminary steps, and again using Dead phone USB flashing, you will flash this time with SW Reset.
- You will get the same countdown after the programming is completed as before. At the recovery dialog, again cancel and disconnect the phone.
- Turn it on, complete the setup and reconnect it.
- Open Nokia Suite and let it install the support software again. As long as you do not have a set of the Belle firmware files on your computer, Nokia Suite will offer to update several apps (Maps, Social, Store, Time Zone updates and Video Player). If you do have Belle on your computer still, you may have to use SW Update on the phone or delete the Belle files first. In XP, these will be in C:\Documents and Settings\All Users\Application Data\Nokia\Nokia Suite\NOSSU2\variants\Production External\Products\rm-609\. Deleting this folder may buy you the time to have Nokia Suite download your app updates so you may have them cached on your PC in C:\Documents and Settings\All Users\Application Data\Nokia\Nokia Suite\NOSSU2\applications\. They may, however, be available on the main screen of Nokia Suite to the far left under Install New Apps.
You're done. One Nokia E6, running Symbian Anna again. Breathe deeply and relax!
Thanks Matthew! I've looked at this procedure numerous times but it always seemed too dangerous and too time consuming.... Comments welcome if any readers fancy having a go at their end, but remember that neither Matthew nor AAS take any responsibility for any damage caused to your phone!


