The story so far
The idea of Sports Tracker originally was that it would let amateur athletes track their training runs/walks/cycles etc. The GPS would keep track of how far they'd gone and report back all kinds of interesting statistics, such as average speed and distance travelled. As a side benefit, the GPS track was also shown visually, and, with an account on Nokia's free Sports Tracker web site, you could use the utility to upload each run/cycle ride to a central server, for others to see where you've been and how fast (or slow) you got there.
As the versions have flown by, Sports Tracker also gained more export functions (e.g. Google Earth compatibility) and also the ability to handle photos taken during your journey and display them at the right points along the displayed track, on the Sports Tracker web site.
The next step
The functionality above is pretty impressive, but in order for others to see where you've been and to see your photos in context, they have to visit the Sports Tracker web site. Linking to the right page from your blog or page is enough, but it's one extra step that visitors need to make and it also throws them into a completely different site, which might be confusing.
![]()
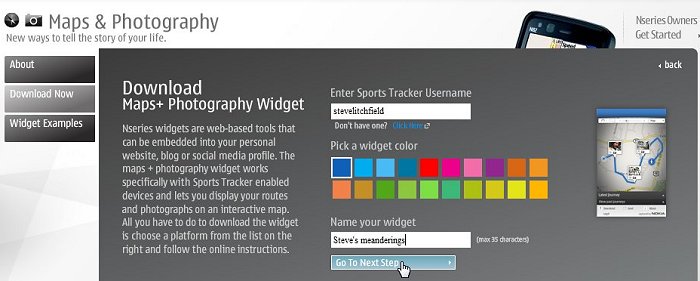
Enter Nokia's clumsily named 'Maps and Photography' widget. As the title suggests, this takes the idea of showing others your tracks and photos and provides the functionality in a handy widget that anyone can embed in any web page, or a social media page or blog (only Facebook and Blogger are 'officially' supported now, but take that with a pinch of salt - the Blogger code is standard HTML and will work in just about anything). See the bottom of this page for a real world example!
![]()
So, for example, you can tell people about your amazing hike over the Quantock Hills at sunset, texually, and also embed the widget next to the main text, for people to zoom in and out of your track, seeing the photos and the exact spots you took them.
Nokia's marketing team used this widget for their 'Urbanista Diaries' month-long experiment, but now the widget's fully available in public form.
Getting started
- First of all, download the latest version of Sports Tracker, either from your smartphone's built-in Download! system or the official Sports Tracker web site. At the time of writing (May 2008) the latest version is v1.71.
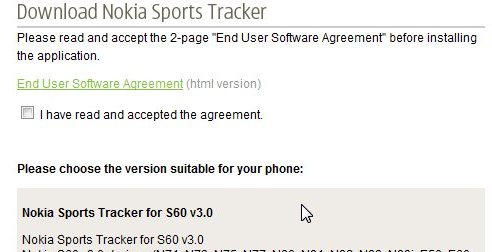
- Set up an account on the Sports Tracker site, if you haven't already.
- Head over to the Maps and Photography site and enter your Sports Tracker username (registration is free) and give your tracks a generic name, e.g. 'My bike rides'.
- On the same site, grab the PDF of instructions and follow the clear steps need to 'pair' your installation of Sports Tracker with your online account.
- Click on either the Facebook or Blogger icons, as appropriate. I'm going with the Blogger option for now, as the generic code will work in just about anything. An example splurge of code is shown, but just click on the 'Copy' button and the right code is copied to your desktop clipboard.
- Paste the code into a new Blogger blog entry, or into your HTML web page, or into a Wordpress blog post, and so on. If you haven't done any Sports Tracker trips yet, you might want to leave the entry as saved but not published until such time as there are trips and photos for people to actually view.
- Do a run. Or walk. Or cycle ride. Or boat trip. Or swim (though I guess your phone might get a bit wet!), using Sports Tracker. I won't go into the details of using the program here. Suffice it to say that you mustn't forget to press 'Start' when you err... start (it's easily done), to start Sports Tracker going in earnest.
- During your trip, take some interesting photos. Don't worry that nothing appears on-screen to tell you that each photo has been geo-tagged. This is because it hasn't - not really. See below.
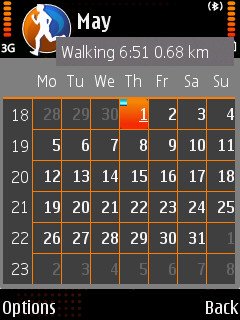
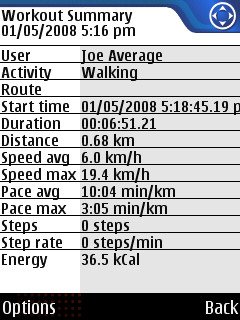
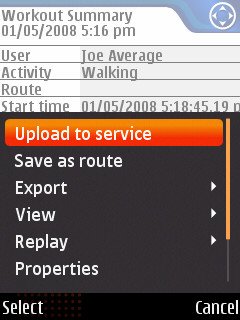
- Back at base, within Sports Tracker, go into your Training Diary, highlight the run/walk/whatever as needed and 'open' it. You'll see the 'Workout summary' screen. Use 'Upload to service' on the 'Options' menu.
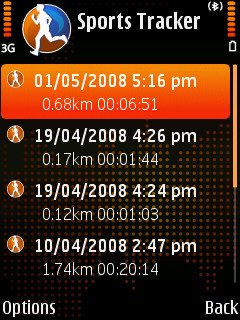
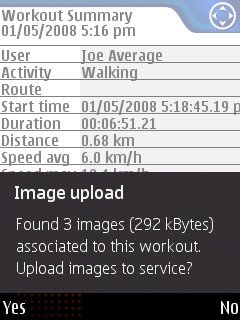
- At this point, you should be asked if you want to search for, and then to upload any associated images. What happens with Sports Tracker is that the utility looks for images on your memory card that were created during the time of the trip. It then looks at the timestamps and works out exactly where each was taken, based on its own knowledge of where you were at any given time. Clever, but it's not true geotagging!
- As part of the uploading process, the images are downscaled to VGA, probably to save bandwidth. In any case, once on the Sports Tracker web site, or using the new widget, there's no facility to view or download larger images, so going VGA makes a lot of sense. And it keeps your data use and uploading times down.
You're done! Within your Facebook page or, once published, your Blogger or Wordpress blog post, or your FTPed web page, the whole world can now see where you ran/walked/cycled, along with all the snaps you took along the way, neatly positioned.
What's next for Sports Tracker?
Most obvious is official support for a wider range of social media. Even though I'd discovered that the Blogger inclusion code actually works inside any HTML-based system, it would be less confusing for new users to see a larger number of blogging and social systems represented on the widget page.
Secondly, although the way Sports Tracker works out where each photo was taken is cool, it would be only a few extra lines of code to retro-tag the original photos with this position information, so that when they're uploaded at a later date to a photo-sharing site (Flickr, Picasa Web, Ovi Share, etc) the right geo-tags are there for the photos to correctly shown on a map once again. In the meantime, if you plan to do this, you'll have to also have Nokia's other free utility, 'Location tagger', running in the background, which seems a bit clumsy!
Making the widget more customisable would be good as well. All you can do at the moment is change its title bar colour - I'd like to see a range of sizes - the current default one is tiny. By manually 'adjusting' the parameters in the Flash widget code, it's possible to get something like the example below, but it would be much, much better to have size changed in a more official way on Nokia's Maps and Photography site.
Example
Here's a trivial example of the end product. I'll do more over the summer - and feel free to comment with the URLs of your Sports Tracker trips!
Tip: If you do not see the Widget above and you are using Firefox. Try right clicking in the blank space above and choose Play.