Introduction
This tutorial comes in four parts: Basic, Intermediate and Advanced followed by an FAQ section.
The Basic Guide will convert an AVI file to 3gp format with the best quality achievable, while still fitting on a 128 megabyte MemoryStick Duo card. The Intermediate Guide helps overcome some video/audio synchronisation problems which can be experienced when converting some AVI files as a result of the compression techniques used. The Advanced Guide deals with serious video/audio synchronisation problems resulting from bad sections of video and how to work around them. Each guide builds on the previous one, so it is best to read them in sequence.
This tutorial is primarily aimed at users of the P900 smartphone. Users of the older P800 smartphone can also benefit, but the quality of the video playback will not be so good.
What you will need
For the Basic Guide:
UIQ Smartphone
128meg MemoryStick Duo
Reasonably fast Java-enabled PC, preferably running WinXP with at least 3 gigabytes free disk space (if your PC isn�t already Java-enabled, go to http://java.sun.com and download the latest Java runtime, which is free)
PV Author � a conversion tool from PacketVideo (http://www.packetvideo.com/shop/authordownload.asp)
PV Author profile for the P800/P900 (bundled with jWavlength from http://www.freepoc.org)
DivX codec � the free one, not the pro version (http://www.divx.com/divx/)
For the Intermediate & Advanced Guides:
VirtualDub � an excellent freeware video editing application (http://www.virtualdub.org/download)
jWavlength � a simple Java program by FreEPOC to find the exact playing length of a WAV file (http://www.freepoc.org)
Some general information before we get started
Video dimensions. AVI files come in a variety of video dimensions. Almost all of them will be larger than the P900�s screen size. This means that the video must be resized to display on the P900. As we will see, this can be accomplished directly in PV Author using the encoding settings. We will use video dimensions of 240x156, which nicely scale to the P900�s screen size of 320x208. We will see how to apply these settings in PV Author a little later. P800 users will need to use settings of 192x125.
Frame Rate. Most AVI files will have a frame rate of over 20 frames per second. Typically you will see numbers like 23, 25 or 30 perhaps including fractional rates. Realistically however the P900 is not sufficiently powerful to process anything more than 12 frames per second � and even then it sometimes struggles to keep up. We will therefore use 12fps as our setting in PV Author.
Bitrate. We want to create a 3gp file which gives the best playback quality while still fitting on a 128meg MemoryStick Duo. In simple terms, the size and quality of the 3gp file vary more-or-less directly with the bitrate. So varying the bitrate setting in PV Author will vary the size and quality of the 3gp file produced. We therefore have to calculate the optimal bitrate in PV Author each time we convert an AVI file. It turns out that an approximate formula for doing this is as follows:
Bitrate = 185,000 * 90 / (length of AVI file in minutes)
This formula works reasonably well for AVI files of between 90 and 120 mins in length (which will include most movies). Using this calculated bitrate setting will usually give a 3gp file of between 120meg and 125meg - just right to fit on a 128meg card (which normally hold a little less than a full 128meg of data). For convenience, we would normally round the bitrate to the nearest 5,000. Again, we will see how to make proper use of this PV Author setting later.
Video/audio synchronisation. AVI files come in all sizes and compression formats. A common format is video encoding using DivX with audio encoding using MPEG-3, a highly efficient compression which will typically encode a full-length movie in around 700 megabytes. However this AVI format can sometimes cause video/audio sync problems when directly converted by PV Author to 3gp for playback on the P900. For example any AVI file which has used a variable bit rate to encode audio will almost certainly cause a loss of sync when converted by PV Author. Typically the video will lag the audio by a small amount � enough to be irritating when viewed. If you follow the Basic Guide below and experience such problems, then try the Intermediate or Advanced Guides.
Setting up
Install the DivX codec, PVAuthor and VirtualDub on your PC. Copy the file jWavlength.jar into the same directory where you installed VirtualDub.
We now want to install the P900 profile for PVAuthor which is included with this guide. In Windows Explorer go to the directory
Program Files > PacketVideo > PV Author > Profiles > Device Specific
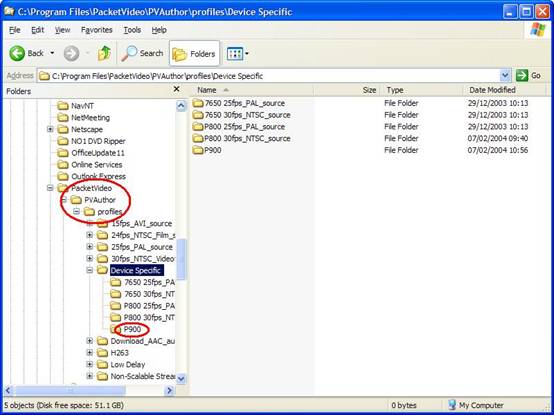
Create a new directory called P900. Into this directory, copy the file P900_b175000s240x156f12vbr.pvp (included with jWavlength from http://www.freepoc.org). P800 users should copy the file P800_b175000s192x125f12vbr.pvp instead.
Basic Guide
This is the fastest way to create a 3gp file which you can play on your P900. Firstly, let�s find out the length of our AVI file. We will need that to calculate the proper bitrate setting in PVAuthor. Right-click on the AVI file in Windows Explorer, and go to the Summary tab. Make a note of the length (in minutes) of the file.

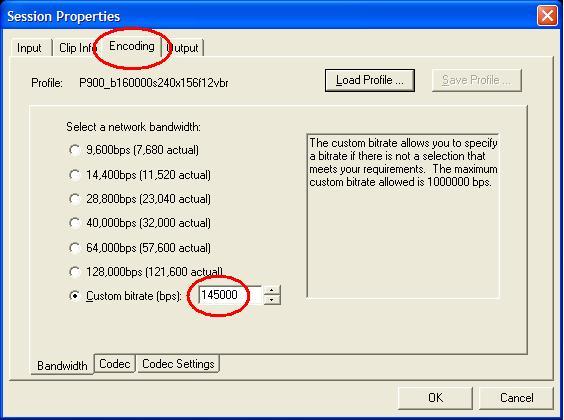
Run the PVAuthor program. Go to the Encoding tab, and load the profile P900_b175000s240x156f12vbr.pvp which you already copied above. You�ll see that the bitrate is set to 175,000. Calculate a new bitrate using the formula we saw above:
Bitrate = 185,000 * 90 / (length of AVI file in minutes)
In this case, our video is 114 minutes in length, and the formula gives a result of approximately 146,000. Round this number to the nearest 5,000 and enter it in PV Author�s bitrate setting. If you wish, you can save this amended profile under a new name, for example P900_b145000s240x156f12vbr.pvp. This profile represents a bitrate of 145,000; screen size of 240x156; frame rate of 12fps; variable bit rate encoding.
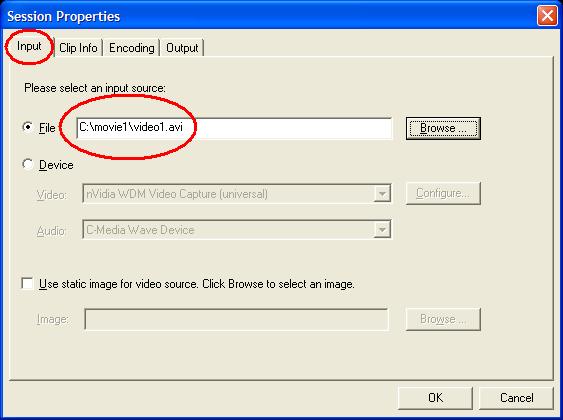
Go to the Input tab and select your AVI file.
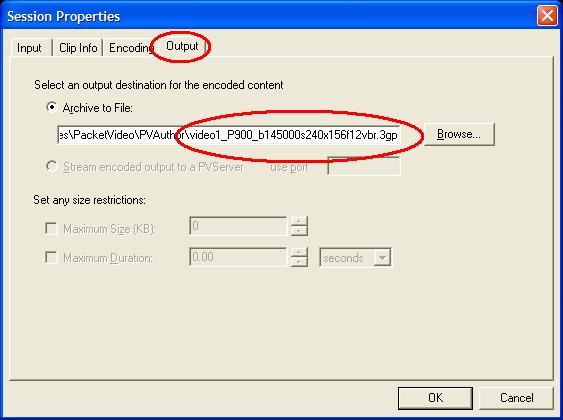
Go to the Output tab and change the name of your Output file if you wish. I recommend at least including the bitrate in the filename so that you have a record of the settings that you used for this particular file.
Press OK, and then Start. Once PV Author has finished processing, your 3gp file will be ready to transfer onto your 128meg card. If the 3gp file is too large to fit, slightly reduce the bitrate setting and convert it again.
Tip: keep your original AVI file until you are comfortable with the results of your conversion to 3gp format.
We are done. The 3gp file will have been placed in whatever directory was shown in PV Author�s Output tab. By default this is Program Files > PacketVideo > PV Author. Copy to your phone and watch the video in full screen in the video player. Enjoy.
Next week we'll have a look at some sync problems that may arise and how to deal with them.