Review: Nokia 808 PureView: part 2c (camera interface, defaults and final quality comments)
In part 1 of my Nokia 808 PureView review, I looked at its hardware and physical capabilities as a smartphone, in part 2a, I showed how PureView works, along with samples of its output and comments on the quality produced, in part 2b, I tested the 808 head to head with its predecessors in the Symbian world, along with the best competing (non-Symbian) camera phone for challenging light situations, the HTC One X/S. In this, review part 2c, I'll cover the massively reworked Camera interface and look at ultimate quality in like-for-like conditions versus the N8.
Defaults and cropping intentions
By default, the 808's designers, in their infinite wisdom(!), decided that the 'Automatic' mode default for the Nokia 808 PureView should be 5 megapixels wide-screen. I can see the attraction for the idea:
- wide-screen (16:9) looks best on the phone screen
- 5MP is a good compromise between JPG size and quality - after all, it was good enough for generations of N95/N82/N97 owners and many Android phones are still 5MP even today
However, almost every really good photo I've taken on my 12 (or 9, depending on aspect ratio used) megapixel Nokia N8 has ended up being cropped slightly, to frame the subject better and to eliminate unwanted detail on the edge of the photo. Thus many of my N8 images actually ended up at around 5MP, but were perfectly composed and dramatic.
You can't really do that with a 5MP starting image - you'd end up at around 2MP and you'd start to hit resolution and quality issues for printing out at 7x5" or viewing on a large monitor. For this reason, and before launching into a look at all the settings offered by the 808 PureView, I find that most of my 808 images from real world events are taken in 'Creative' mode, preset to 8MP mode and 'Vivid'. At which point I want to address a recurring comment about my previous review part.
You see, I was, in part 2b, looking at devices with a wide range of capture resolutions and options, so my 'focus' (see what I did there?) was to crop to show similar details in the images, so that the eye could easily see differences. My priority was on these details, not on maintaining 1:1 magnification equality between the test photos.
N8/808 like-for-like examples
However, with the N8 used explicitly in 16:9 9MP mode, and the 808 in 'Creative 8MP Vivid' mode, we have a more exact like-for-like situation and let's start with this, I've picked out two of my recent (and typical) comparisons. Comments welcome, as before.
Test 1: Moody sunlight, medium distance subject (around 50 metres)
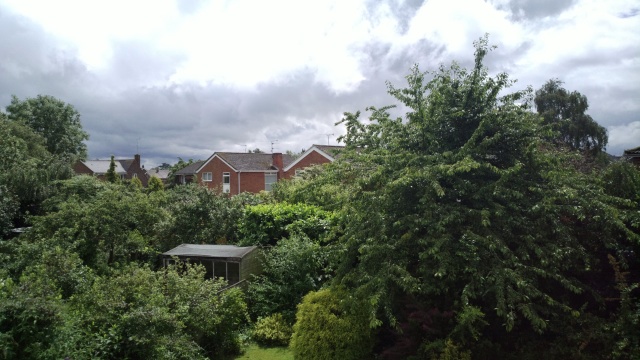
Taking this same scene on the N8 and 808, I've cropped into a central detail, as usual, N8 on the top, 808 on the bottom:
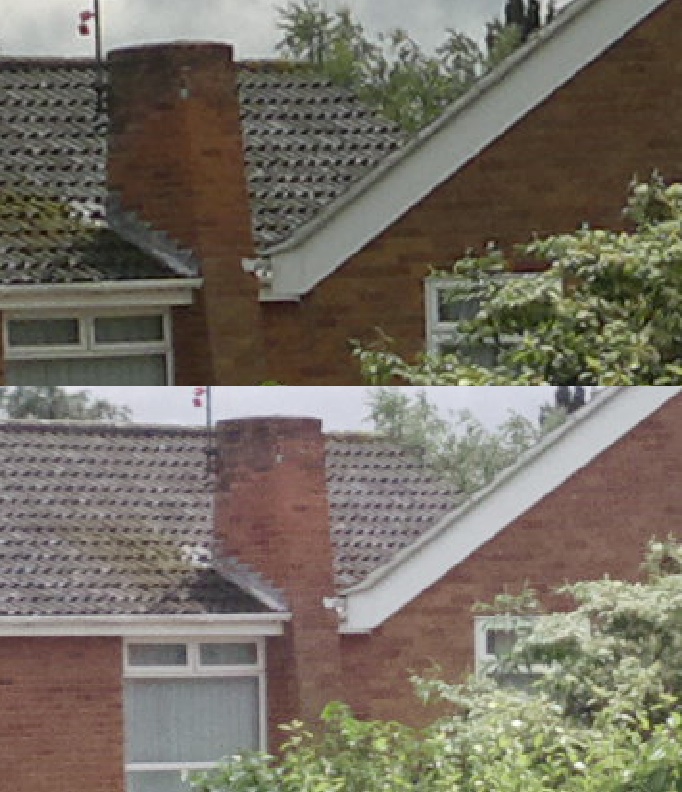
I have to say that the photo crops above are a) inconclusive and b) typical of my N8/808 comparisons under these conditions. You can make the case that the N8 photo has slightly more contrast and detail, or that the 808 photo has more natural, purer colours and greenery. They're both pretty good overall and yet subtly different. See my conclusion below for more!
Test 2: Indoors, artificial lighting, Xenon flash on, subject around 2 metres
Taking this same scene on the N8 and 808, I've cropped into a central detail, as usual, N8 on the top, 808 on the bottom:
Again, this is typical of indoor/flash shots on the two phones. The N8 photo again appears to have more contrast and detail, but then you look more closely and the PureView finesse starts to win you over. For example, the block red of the special offer sign and the lack of digital artefacts around the text. With these crops, an observer would probably say the N8 photo is better, but remember that the 808 photo has a significantly wider angle, so there's more in each frame and details within the frame thus appear smaller. Again, honours roughly even under these like-for-like tests.
N8 to 808 upgrade conclusions
Over the last two weeks, I've taken close to 1000 photos with the 808 PureView, around 100 of which were mirrored by the N8. And following on from my bullet point conclusions in the last review part, I'd make the following observations:
- The N8 camera was good. It was very good. Better even than Nokia would doubtless like to admit now that the 808, developed in parallel, is available. And in some scenarios - extreme (10cm) macro shots in particular, and indeed medium distance shots in good light - the N8 produces photos with arguably better detail.
- However, the 808 camera is much more flexible than the N8's. While it may not nail that extreme macro or medium distance shot as well as on the N8, the flexibility to zoom in (by 2x, losslessly, in 8MP mode) almost always compensates in terms of getting the exact shot you want.
- Plus the 808 camera is much better in very low light and extremely challenging conditions, due to the larger aperture, the larger (1/1.2" versus 1/1.8") sensor, and the double strength Xenon flash and PureView oversampling/noise reduction.
To summarise my summary(!) and to put the 808 in context here, I'd suggest that N8 owners probably shouldn't rush to upgrade to the 808 purely for the stills camera - it's better, overall, but not £500 better. However, throw in the brighter Xenon flash, the far better video capture and Rich Recording (more of both of which in review part 2d), much better screen, faster processor and more RAM, and you've got a massively compelling case.
Quick access
The first point of very important note is that you can start Camera on the Nokia 808 from a keylocked state by simply pressing and holding down the shutter key. Moreover, keep the key pressed down for an extra second and the camera will focus and take a shot. Or hold it down for as long as you want and the 808 will keep taking photos, in a 'burst' mode, albeit limited by the one second it takes to process the 41 million pixels' worth of information for each shot (remember that even 2MP PureView images still involve oversampling from the full sensor).
In practice though, not having to first use the phone's keylock toggle is a major convenience. Taking a photo as well (by carrying on with the keypress), for example in the situation where you see something extraordinary and simply have to snap it, is terrific and one wonders why camera shutter buttons haven't done all this before on Symbian smartphones.
One oddity is that there's no on-screen way to exit Camera - instead, you have to press the red/hangup button. This works effectively, but is a little odd after getting used to 'back' icons everywhere else in the interface.
Camera interface on the Nokia 808
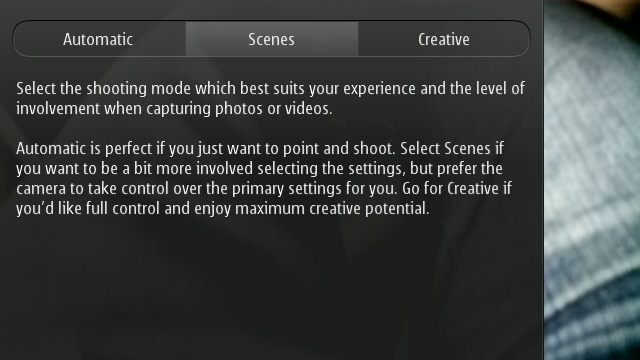
As intimated in previous review text, the 808's USP, its camera, can be run in any of three separate modes, each geared to different levels of expertise and expectation. Tapping on the button top-centre gives this screen of advice:
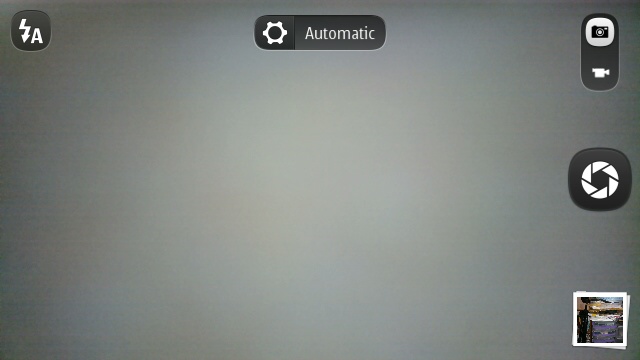
'Automatic' is, as it sounds, the default and suitable for new users. It's also good for when you're in a hurry at a event and haven't got time to stop and think about photos, you just want to grab shots and don't care about resolution or any advanced settings. Everything ends up at 5 megapixels in 16:9 ratio, which has its own possible downside, as noted above.
In 'Automatic' mode, the only thing a user can change is the flash mode, i.e. on, off, auto or 'red eye', the latter injecting a couple of small Xenon flash firings before the 'big one', so that your subjects' eyes can close up their irises and reflection off the back of their retinas can be minimised. It works better than on the N8, but isn't foolproof.
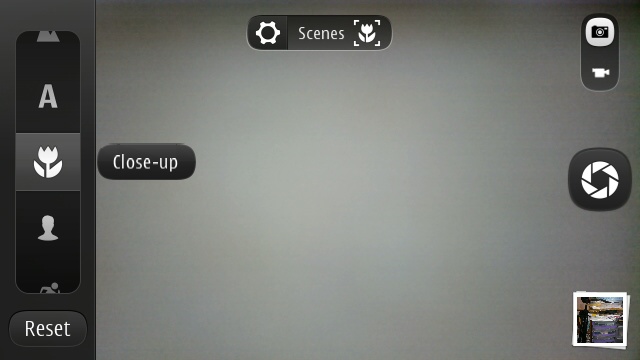
In 'Scenes' mode, there's the familiar (to Symbian users) selection of 'presets': Landscape, Auto, Close-up, Portrait, Sports, Night and Night portrait, plus a couple of scene presets that are new for the 808: Spotlight (optimised for gigs and events, with extremes of light and with coloured lights, exposure is dropped and colours are de-saturated) and Snow (optimised for high white content across the frame, i.e. exposure is raised higher than in 'Auto' mode). Resolution is still forced to 5MP though.
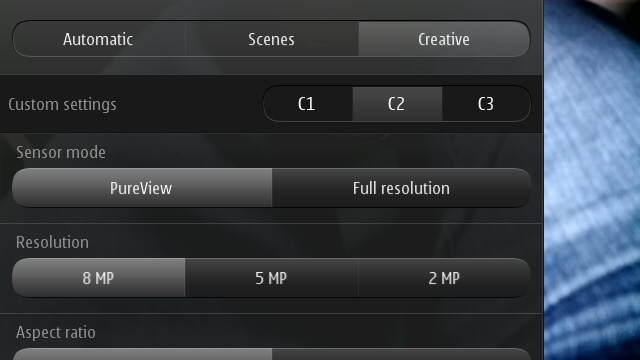
Finally, there's 'Creative' mode, where absolutely everything can be changed, and at three different levels of interface. Mind bogglingly so, but I'll walk you through screenshots of most of it. With the parameters of Creative mode set (of which more in a moment), here's the interface, showing left-hand side controls for flash (again), exposure (while adjusting this, there's a histogram shown to help you work out what the correct exposure should be), white balance (sunny, auto, cloudy, incandescent and fluourescent), ISO (simulating 35mm film speed, from ISO 50 to 1600, useful for grabbing fast shots in low light conditions at the expense of extra sensor noise) and Neutral Density (off, on, auto, this puts an optional mechanical filter in front of the lens to deliberately reduce the amount of light entering - useful on very sunny days or when trying special effects with long shutter speeds):
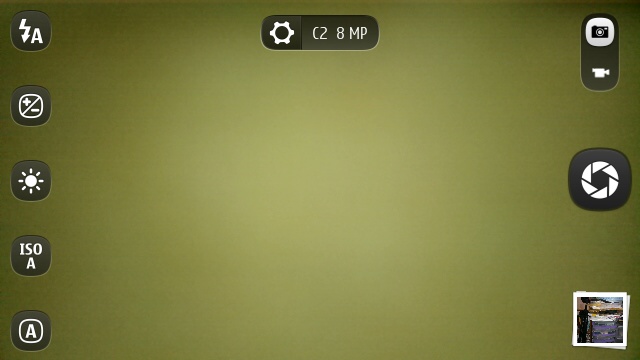
I liked the way, in the main viewfinder, the top of screen settings control is always renamed with the currently active Camera mode, e.g. 'C2 8MP' above. C1, C2 and C3 are presets that you can establish in 'Creative' mode, to remember particular combinations of detailed settings. C2 is my default, with C3 set by me to be optimised for low light, fast moving shots, for example.
Moving down the settings pane for 'Creative', 'PureView' gives the choice of oversampled resolutions shown (and of 16:9 or 4:3 in each), while 'Full resolution' gives you the choice of 34MP widescreen or 38MP 4:3 modes. As with the Nokia N9 and Lumia 800/900 camera units, the 16:9 images in each case aren't just crops from 4:3 ones - they physically use a wider strip of the raw sensor.
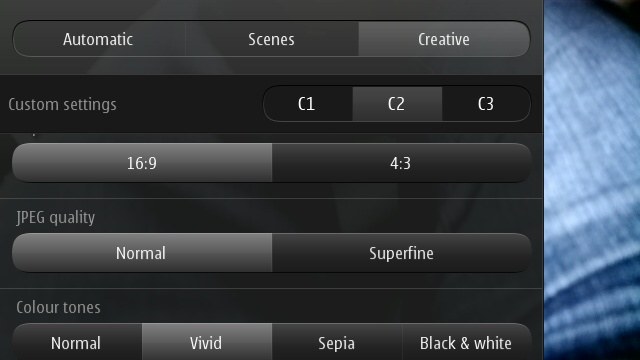
'JPEG quality' is an interesting one - most people will be fine on 'Normal', but I do know that others are fixated on absolute pixel quality and don't like to see any JPG compression, even if it means larger file sizes. The 808 PureView won't deliver 'RAW" images, for both practical and technical reasons, but you can get very close with 'Superfine' JPG compression, roughly doubling photo byte sizes but significantly reducing any tiny JPG artefacts.
'Colour tones', by default, are somewhat pale in 'Creative' mode - I tend to leave this setting on 'Vivid', in which results are similar to those in 'Automatic' and 'Scenes' modes - but colours are always a personal preference.
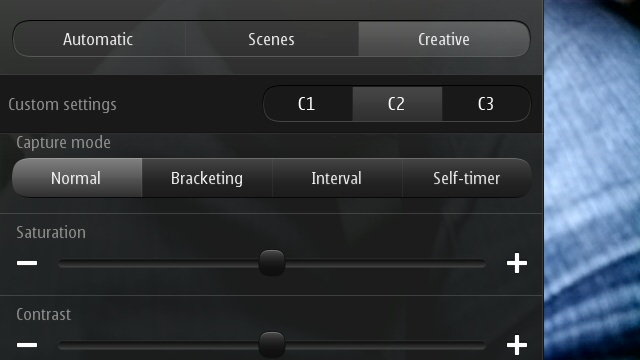
...And if you want even finer control over colour handling, there are sliders for 'Saturation', 'Contrast' and 'Sharpness'. I'd suggest leaving all of those on the default 'middle' setting, but the 808 gives you the ability to fiddle if you feel the need.
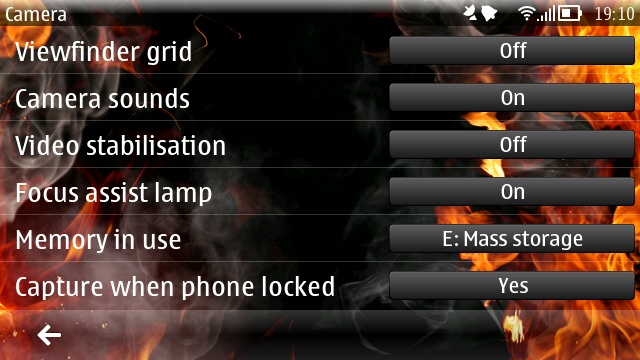
Tucked right at the bottom of the 'Creative' pane is a shortcut to a legacy Symbian dialog, part of Camera from previous incarnations and shown below. There are new and helpful options included though, not least the ability to turn all camera sounds off (very useful when trying to be unobtrusive at an event), and being able to turn video stabilisation on or off (the default is off, I'll be testing this feature in the next review part).
Zooming
At any point in any of the PureView modes, you can zoom in using either the physical volume/zoom buttons (my preferred way of working, but then I'm 'old-school'!) or by swiping your finger up the screen, whereupon a framing box appears - essentially, you stop swiping when the framing looks about right in the viewfinder.
Both methods work well, though do note that, sensibly, you can never zoom beyond 1:1 sensor pixel usage, i.e. you're not allowed to stray into typical digital zoom 'lossy' territory. Let me emphasise this point - all zooming on the 808 PureView is 'lossless', in that one pixel in the final image always corresponds to at least one pixel in the underlying sensor - there are no 'made up'/artificial digital zoom interpolated pixels.
As I've said before, having a zoom that you can trust is tremendously freeing on a camera phone, just as it is with an optical zoom on a standalone camera. Except that with the PureView 'software zoom' technology there are no bulky optical elements to suck up power, make a noise or reduce the light ingress.
The combination of having zooming always available to create 'tighter' cropped photos of potential subjects, allied to shooting (in my case) at 8MP, with the potential for a little cropping later on, improves my photo composition, even over the flexibility that the N8 offered, with its slightly higher default resolution.
Summary
Overall, I've been very impressed by the Camera interface for the Nokia 808 PureView, with clear optimisation for left and right thumbs when holding the device in landscape fashion, with unrivalled customisability and with a unique zoom control. It's unlikely we'll see it on any other Symbian phone, mind you, at this late stage in the OS's life cycle, but it's entirely possible that much of it could be ported to a future Windows Phone PureView incarnation (the existing WP Camera interface is extremely barebones).
I loved the breakdown into three shooting modes - even though I end up in 'Creative 8MP' mode most of the time, I can see many less ambitious (in terms of not wanting to crop images later) users sticking with 'Automatic' or 'Scenes'.
________
In the next review part, 2d, I'll be looking at video capture and Rich Recording - an area in which the Nokia 808 really excels.
Reviewed by Steve Litchfield at