First of all, here's a sample (the subject matter isn't relevant, I just happened to be in a market square while there was a demo hunt starting):
When YouTube started (and still by default), the lowest common denominator encoding of its videos was something of a standing joke. But now, if you know what you're doing, you can get higher quality for your blog-embedded videos.
- Garbage in, garbage out, obviously. So make your video captures as good as possible. The usual suspects apply here. Shoot in sunlight if possible, try not to shoot into the sun, shoot subjects at an appropriate focus point, depending on your device (the N82 is good at close-ups/people, the N96 [and N85 etc] are preset to focus on more distant objects - annoyingly).
- Be aware that audio quality during video is just as important as picture quality. Try to shield the phone's microphone hole from wind, or even cup your hand so as to channel sound from in front of you into the hole. Note that audio quality varies a lot on a sliding scale, from N93 = superb, right to N96 = awfully hissy, though it will also depend on which firmware your phone is on.
- Obviously, from your Mac or PC, upload the original VGA footage (in the example above, from a Nokia N95 8GB with slightly scratched camera glass - didn't seem to make much difference though) if you possibly can. Merge/cut several videos on the phone if you need to, but best not to import/process/re-encode them on a PC, as this will start to degrade the footage. Your VGA videos should be of the order of 20MB per minute of footage, if your MP4 files are much smaller than this then you're shooting at too low a resolution. Double-check in 'Settings' (in S60 Camera) that you're using the very highest quality/resolution setting.
(Incidentally, ShoZu and the like are probably non-starters - there's no way you're going to want to be uploading 50MB files from a phone etc.)
- Having uploaded your file, there's a short wait while YouTube's servers 'process' it. In practice, this means re-encoding it to their own Flash video format. It's also quite low resolution (QVGA?), so the first trick is to wait a little longer. YouTube's servers have spotted the fact that you've uploaded a high resolution video and have set to work doing a second encode, this time to a much higher resolution. An hour or so after the video first goes live, a 'Watch in high quality' link pops up below the main video window and viewers can then choose to switch to the higher bandwidth, higher quality version if they like.

BUT. What if you want them to watch it at full resolution and what if you want to embed the video into your own site or blog? The embedding code YouTube supplies by default only brings up a small window and, even when you learn how to enlarge this, you're still stuck with the blocky low resolution video filling your frames!
Or are you?
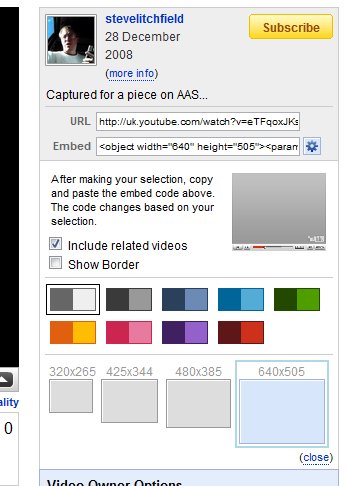
- First things first. Click on the little gear wheel icon besides the embedding code. Choose the largest of the possible embedding frame sizes. This just happens to be 640 pixels wide, perfect for your new videos.
- Click the embedding code and copy it into a web page of yours or a blog entry. You now have a window that's the right size, pointed at your video.
- Finally, edit the raw HTML code in your page/entry and add the text string "&ap=%2526fmt%3D18" after each of the two occurrences of "&fs=1" in YouTube's embedding code. This magic incantation is a way of forcing YouTube's servers to dish up the high quality, high resolution video stream instead of the low quality version.

Job done! You now have your phone-shot VGA videos displayed at optimum quality in your web page or blog, with all bandwidth at YouTube's expense. And, if your footage was well crafted enough in the first place, you will hopefully get at least some of your viewers admiring your work and amazed that you shot it all on a 'phone'...
Steve Litchfield, All About Symbian, 29th Dec 2008
PS. The next obvious question is about shooting and embedding in the currently popular 'Wide screen' format - I'll come to that in another tutorial!