Part 5
Changing the Core
In which we'll make the first changes to Event Core and see
the app starting to come together on our Communciators.
First Steps with the Event Core
Right, time to actually do some honest to goodness, real life
coding. Either power up the emulator, or switch your phone
on and set up the following using the File Manager.
Copy the master.mbm you created earlier into "\System\Apps\Master\"
directory
You may need to make this directory. The System\Apps folder
is like the "Program Files" folder on a PC - each
app has it's own directory (which must be the same name as
the files the translated application will have; in this case
"master" ). In the File Manager application you
may need to change the preferences so you can see the System
directory.
Create a top level directory called "Programming"
Given time, you'll build your own programming practices and
habits. In the meantime you'll be using a version of my own
(with the arcane and obscure stuff removed). All my application
work takes place in a Programming folder that is separate
from the Documents folder.
Go into "Programming" and create a directory
called "Master"
Each application or project gets its own folder to keep everything
organised.
Copy core.opl into this directory and rename it "master.opl"
Now, you don't need to put that .opl at the back of the filename,
but it means that code is easily recognisable from translated
modules when you look at a directory. It is personal preference,
and seeing as you're following me, you're stuck with it for
a bit!
Oh and if you've forgotten, the core.opl is available from
http://www.freepoc.org/core.htm
Editing core.opl to Make master.opl
Changing the identifiers
Thanks to the use of constants, it's actually quite easy to
alter the core.opl into your application. Open up the (now
renamed to) master.opl and look at the constants listed at
the start of the app. AT the moment they read as follows...
CONST K_Author_Email$="[email protected]"
CONST K_Author_Name$="Ewan Spence"
CONST K_App_Name$="Core OPL"
CONST K_App_Ver$="1.00"
These four are all pretty self explanatory. Your email and
name are used in any copyright notices and in the About This
Application box. The App name is used in the Menus, title
bars, about boxes, and anywhere else.
Put in whatever you feel appropriate here - and don't forget
they are easy to change!
A quick word about version numbers here, when developing
it is always a good idea to start off with 0.01, and leave
version 1.00 for your first release. Before releasing an app,
I just increment the numbers (0.01 is the first, 0.07 is the
seventh major revision, 0.23 is the twenty third, etc.).
On release of any bug fixes increment by 0.01, so 1.01 is
the first version, but with one bug fix release. Any small
improvements that don't change the main points of the app
(e.g. adding in more tile sets in Vexed, or a new batch of
colours in Clock6) would take the version up to the next tenth
(i.e. 1.01 would jump to 1.1, not 1.11. 1.11 is for the first
big fix!).
Right, translate that by hitting the translate CBA button.
Have a look round all the menu system and suchlike and you'll
see all the relevant names, numbers, and emails are in place!
Setting Toolbars and Titlebars.
As discussed before, these are set (and stored) in the .ini
file. If you don't alter them from those set in the Event
Core, then you'll get an app with the CBA always visible,The
title bar on, and the large status bar on the left.
Having a look through the PROC init: you'll find this line...
AfSetTitle:(K_App_Name$,KAfTitleTypeMainTitle%)
...and because you've set K_App_Name$ in the constants section,
you don't need to alter this either.
We'll get around to renaming the CBA's later on, but again
you can see where they are set in PROC init: In the opl code
at the end of the tutorial, you'll find the CBA's are working
(so you can close the app) but I'll explain how in the next
part. In the meantime, you can have a look at it yourself
and see if you can work it out.
Loading Graphics
If you have a look back to Part 3, you'll recall how we gCREATE'd
and gOPEN'd graphical windows and bitmaps. Any global graphics
(windows or bitmaps) are created at the end of PROC init:.
When I program, I usually use the GLOBAL id%(16) to hold all
my graphical elements. I also tend to use id%(1) to id%(8)
for windows and id%(9) to id%(16) for bitmaps.
It's always a good idea to use REM statements, but I think
it doubly important here, because the graphical elements are
something you may constantly use and need a ready reference
for.
Translate and Check
Once you've edited PROC init: of the core, this is usually
a good time to translate the OPL code and see that yo haven't
made any mistakes. While you could write your whole app before
translating, if you build up the app logically (remember the
story analogy) you should be able to check it after each major
section for change. Then if you do have problems, it's likely
to be in the most recently typed in code.
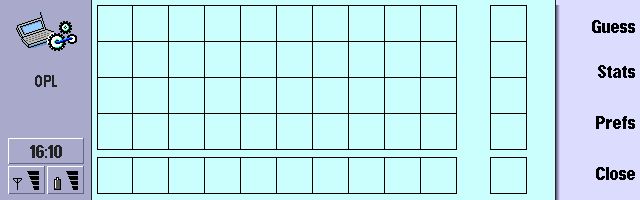
Working With The Main Screen
Master has one main screen, displaying the ten guesses, the
solution, and the winning pattern on the far right. What we'll
do now is lay out these grids, ready to start playing in Part
6.
Showing balls
This section here is damm important. I've had a quick look
back at my older Series 5mx apps, and a variant of this procedure
features in the last 5 applications I've programmed, so in
my mind it's an important principle, and the foundations have
already been laid.
One key in computer code is being able to re-use code whenever
possible, especially if you end up doing the same thing over
and over again. In Master, you're going to be showing a lot
of balls, all over the screen. How do we do this? Like this:
PROC m_showball:(foo_turn%,pos%,ball%)
   gUSE id%(1)
   gAT (foo_turn%*36)+5,((pos%-1)*36)+5
   gCOPY id%(10),36,0,36,36,1 : rem * Mask
   gCOPY id%(10),(ball%+1)*36,0,36,36,0 : rem * Ball
ENDP
Now whenever we need to print a ball, we call this procedure,
and pass it three values.
The first is foo_turn%, which lets the procedure know what
column of the grid to use (from 1 to 10), depending on what
turn of the game it is. We don't use the main turn variable
as we may want to print out of position at somepoint.
Value two (pos%) gives the row in which we should print the
ball (1 to 4).
Ball% gives the number of the ball which is 1 to four (on
easy skill) up to 8 (on hard skill). Ball%. Can also take
the value of zero, which will display a blank square.
We then use those numbers in the gAT ( coordinate, y coordinate)
to move the cursor to the correct starting pixel for our two
gCOPY commands.
Why have we not used one gCOPY command? It's because we have
a background. If you copy the square that contains the ball
directly into the grid, (gCOPY with a (3) the in the white
spaces around the ball are copied as well, obscuring the background.
If you use the gCOPY flag (0) that only sets the pixel, you'll
fin the background image interferes with the colours.
The solution is in two steps - one per gCOPY command. Have
a glance at the single mbm graphic that holds all the coloured
balls. The first square is a ball that is all black, with
no shading on markings. This is a mask. If you look at this
next to one of the true ball icons, you'll see that every
black pixel in the mask corresponds with a black or coloured
pixel in the real graphic.
If we now use gCOPY flag (1) - which is 'clear pixels' all
the pixels that are black in the mask will be cleared from
the main window. This is our first gCOPY command above.
We can now safely use the gCOPY flag (0) that only sets the
pixels, because the pixels that are being set, are all being
set on cleared white pixels! And voila! We can now copy our
coloured ball into place, and leave the rest of the background
intact.
Showing Spaces
Hold on though. In the application the procedure looks like
this.
PROC m_showball:(foo_turn%,pos%,ball%)
   gUSE id%(1)
   gAT (foo_turn%*36)+5,((pos%-1)*36)+5
   IF ball%=0
      gCOPY id%(9),foo_turn%*36)+5,((pos%-1)*36)+5,36,36,0
      gCOPY id%(10),0,0,36,36,0
   ELSE
      gCOPY id%(10),36,0,36,36,1 : rem * Mask
      gCOPY id%(10),(ball%+1)*36,0,36,36,0 : rem * Ball
   ENDIF
ENDP
This is because we need to do something slightly different
when we want to clear a ball. We don't want to punch a hold
in the background image (or overwrite a ball already there).
What we want to do is restore a portion of the background
image (the first gCOPY line) and then copy the grid line from
the mbm (the second gCOPY).
Laying out all the Boxes
So, now we have all the elements to draw the grid on the
screen. Almost. Two new commands for you to look at.
gBOX width,height
This draws a box, with the top left corner where your cursor
is at (remember this is changed by gAT x,y).
gLINEBY x_distance,y_distance
This draws a line from the cursor to a point that is x_distance
to the right, and y_distance down. If you use negative numbers,
then it is to the left and up respectively.
Lets look at the procedure...
PROC init_display:
   LOCAL foo%
   rem *** Copy the background into the main window.
   gUSE id%(1)
   gAT 0,0
   gCOPY id%(9),0,0,548,200,3
   rem *** Draw the squares of the grid using supplied bitmap
   foo%=-1
   DO
      foo%=foo%+1
      m_showball:(foo%,1,0)
      m_showball:(foo%,2,0)
      m_showball:(foo%,3,0)
      m_showball:(foo%,4,0)
      m_showguess:(0,0,foo%)
   UNTIL foo%=9
   rem *** Draw the outside of the grid and the solution boxes
   gAT 5,5 : gBOX 360,145 : gAT 5,157 : gBOX 360,37
   gAT 398,5 : gBOX 37,145
   gAT 398,41 : gLINEBY 36,0
   gAT 398,77 : gLINEBY 36,0
   gAT 398,113 : gLINEBY 36,0
   gAT 398,157 : gBOX 37,37
   gVISIBLE ON
ENDP
The rem statements show what's happening in each section.
Note the use of a DO... UNTIL... loop to make our life easier
for the largest grid. In the loop, we draw both the guessing
grid (on the top) and the how well we did grid (on the bottom).
Because of how our mbm is laid out, we need to draw in manually
the right hand edge and bottom edge.
Finally, we draw the column on the far right that we will
use to show the correct solution when our ten guesses are
up, or when we correctly guess the solution.
Showing Guesses
Have a quick look at PROC m_showguess%:(right_place%,wrong_place%,foo_turn%).
When we come around to doing the part of the program that
needs to show how accurate the guess is, we'll use this procedure.
But we'll also use it to show a blank space, and this is
the only part of the procedure currently listed. It's the
same theory as showing a blank space in the PROC m_showball:
Conclusion
So, if you run Master now, you should see the main grid.
Okay we can't see any balls, even though we've discussed how
we're going to do it in this part, but relax. Next week you'll
see how to put a cursor onto the screen, move it around, and
use it to select your four coloured balls to make a guess!
 Source
Code Source
Code
You can download the OPL source code for Master as it is at
the end of tutorial 5 here.
You can download the opo program (the runtime file) as it is
at the end of tutorial 5 here.
Got any questions or comments arising from this tutorial.
Need help with OPL. Head to the forums
for help from the friendly community.
|